Saturday, February 18, 2006

Cream Cheese and Hidden Berry Cup Cakes

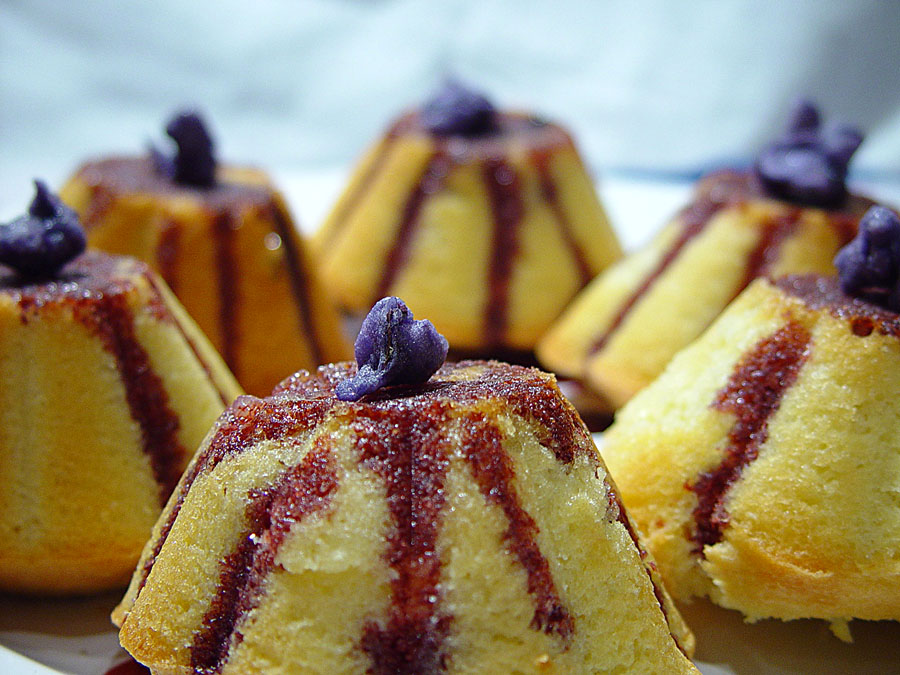
I have bought a book by new zelander Julie Le Clerck which is full of wonderful recipes of small cakes. It is called Little Café Cakes. In my opinion there is nothing nicer than to be served an individual portion of cake, your own little delicious treat. This one is definitely one that will make you feel special.
When I first read the title of this recipe I thought that the cream cheese was going to be incorporated into the mixture. It was a surprise to see that it was just not the case. The cupcake recipe itself is very simple and equally delicious. The cake turns out soft and lovely. When it comes to taking a bite it is a wonderful sensation to have the cheese cake taste followed by the berry.
One thing that I would like to say is that I have also made this recipe without using the custard powder. I doubled up the amount of flour instead.So if you happen not to have any custard powder at home don't be too bothered.

100g butter, softned

½ cup sugar – 100g

4 small eggs

½ cup plain flour – 75g

½ cup custard powder – 75g

1 tsp baking powder

½ cup cream cheese

Fresh raspberries

Pre-heat oven to 185oC/175oC fan assisted oven. Grease and flour 10 individual cake or muffin tins.

Cream butter and sugar until pale then beat in the eggs. Stir in sifted dry ingredients.

Spoon part of the mixture into prepared tins so that they are ½ full. Top with a teaspoonful of cream cheese and a couple of raspberries. Cover with remaining cake mixture.

Bake for 20 minutes or until springy to the touch.

Ice with pink icing.

Pink icing

1 cup icing sugar

1 tblsp lemon juice

1 drop red food colouring

Mix all ingredients with just enough hot water to form a smooth, flowing icing.

Monday, February 13, 2006

Date Crumb Bake


I am a big fan of slices. I find them very practical and often terribly yummy. I also love the fact that they do not make me feel very guilty for eating them - this is due to their size. Obviously at the time of cutting I can make them look even smaller and the guilt would be even less. This recipe caught my eye because of the dates and the fact that they would be used in pulp form. I am a big fan of creamy and crumbly. I have pretty much stuck to the original recipe apart from the flour which I decided to do half wholemeal. I also used a basic muesli mix as opposed to only oats. I thought that it would have been more interesting. I'm glad I made that call.

125g butter, plus extra for greasing

250g dried ready-to-eat dates, chopped

125g self-raising flour

125g wholemeal self-raising flour

250g dark muscovado sugar, sifted

2 tbsp oats

½ tsp ground cinnamon

1 egg lightly beaten

Pre-heat the oven to 180oC/fan 160oC/gas 4. Grease a non-stick baking tin (about 17.5 cm x 27 cm x 4 cm deep).

Pour 6 tablespoons of boiling water over the dates. Leave for 5 minutes to soften then whizz in a food processor or blender to a rough paste.

Sift the flour and sugar into a large bowl, add the butter, and rub in until just crumb-like. Tip half the mixture into another bowl and stir in the oats. Rub the remaining mixture until the crumbs are very fine, then stir in the cinnamon and egg to get a moist dough. Press this evenly into the base of the tin.

Spread the date mixture over the base, then sprinkle over the oaty crumb mixture, pressing down lightly. Bake for 20-25 minutes, until the topping is golden. Cool in the tin and cut into 21 squares to serve.

Saturday, February 11, 2006

Little Chocolate Brownie Cakes

This is a different way to prepare chocolate brownies. I am a big fan of preparing cakes/brownies and all things similar to that in small and individual portions. I think that there is nothing more lovely than having your own little cake. I have just bought a book by Julie Le Clerc which is all about little cakes, gorgeous little gems.This recipe is in the chocolate section.

One thing that I found with this recipe is that perhaps the baking time can be reduced by 5 minutes so it is more like 20 min. Even so I would recommend that you checked the brownies a few minutes before the set time as they tend to get dry very easily if in the oven for a tad too long.

You can replace dark chocolate bits for white or milk chocolate ones. Another option is to add ½ cup of chopped nuts or raisins to it instead of the chocolate.

100g butter

200g quality dark chocolate, roughly chopped

2 small eggs, lightly beaten

¾ cup caster sugar

1 cup flour, sifted

½ cup white chocolate bits


Preheat oven to 180oC (fan assisted)/ 109oC (normal oven). Grease and flour 12 individual cake or muffin tins or a small slice tin.

Melt butter and chocolate together in a double boiler, or microwave for 2-minutes. Cool a little then stir in the beaten eggs and sugar.

Stir in the flour and beat to combine. Stir in the white chocolate bits.

Spoon mixture into prepared tins and bake for 25 minutes or until a skewer inserted comes out clean.

Dust with icing sugar to serve.

Sunday, February 05, 2006

Salmon with wasabi mayo

This recipe is from a magazine I subscribe, Olive. I loved it because first of all I love fish. I also love unusual recipes, new flavours that I don't often put together : salmon and wasabi sauce when the salmon was not in its raw form. Truth is, I could eat fish every day. I really love it that much. I do not eat it as often as I liked and when I have the chance I often over do it.Anyway..here goes the recipe:

Salmon 2 x 175g fillets

miso paste – 1 tsp

sesame seeds – 1 tbsp

wasabi paste – 1 ½ tsp

mayonnaise – 2 tbsp

lime wedges to serve

Heat the oven to 140oC/fan 120oC/gas 1. Put the salmon skin-side down on a non-stick baking tray and smear the miso paste over the top. Brown the sesame seeds gently in a dry frying pan. Scatter them over the salmon, pressing them into the miso. Bake for 12-15 minutes. Meanwhile, mix the wasabi with the mayonnaise and put a tbsp on each plate with the salmon and lime.

Saturday, February 04, 2006

Steamed Mussels with wine and parsley leaf


I am a big fan of seafood. Mussels were something that I would always have at friends' house or in restaurants. However today on getting to my local fishmonger's I decided that it was about time I prepared my own. I guess I was into setting myself a challenge. Not that I thought it was a particularly difficult dish but I knew that you had be to careful about selecting the 'good' ones to prepare. I have a book by a once fishmonger who is now a chef, Mitchell Tonks, and sometimes I go to if for seafood recipes. I chose a very simple and terribly yummy recipe. If you are a lover of mussels as I am I do recommend the recipe. The juices have a lovely taste because of the wine, garlic and shallots. I even had some bread to soak up the juices left in the pan.

Allow 600g of mussels per person as a main course and 300 grams as a starter. The amount below is for a 6oog portion. Just half or double it according to your needs.

2 cloves of garlic, finely chopped
1 shallot,finely chopped
a glug of olive oil
25g butter
1 wineglass of dry white wine
a handfull of fresh parsley leaves, chopped


Put the olive oil and butter into a large pan and add the garlic and shallot.Cook gently until softned. Do not allow them to brown. Add the wine, boil for a minute and then add the mussels. Replace the lid and cook, giving the pan a shake form time to time. The mussels are ready when they have opened - discard any that don't. Spoon the mussels into a serving bowl, then stir the parsley into the juices in the pan and pour over the mussels.

Yummy.

Wednesday, February 01, 2006

Cinnamon and mascarpone ice cream


I bought this Marie Claire book entitled Flavours a year ago. I fell in love with the way it is laid out. The chapters are: Vanilla, Lemon & Lime, Ginger, Chilli, Garlic & Onion, Chocolate, Salt & Pepper, Basil & Mint, Cinnamon & Spice.

This recipe is one of many that I have selected as to be prepared. On an impulse I went out and bought myself an ice cream maker and finally my recipe materialized. However, you do not need an ice cream maker to prepare this recipe.

The result was velvety, very creamy, with a wonderful cinnamon taste in the background. I know we are in winter but as a friend’s Italian dad used to say ‘Why do people think that ice cream is only for summer?’ – he was the owner of an ice cream parlour back in Brazil.

1 ½ cups sugar

1 ¾ cups (14 fl oz) water

2 teaspoons ground cinnamon

450g (14 oz) mascarpone

½ cup (4 fl oz) cream

Place the sugar and water in a saucepan over low heat and stir until the sugar has dissolved. Simmer for 3 minutes, then remove from the heat, add the cinnamon and leave the syrup until cool.

Mix the syrup with the mascarpone and cream. Place in an ice cream maker and follow the manufacturer’s instructions until the ice cream is thick and scoopable.

Serve in scoops with fruit and crisp biscuits. Serves 6.

Note: if the mascarpone is not available, combine equal amounts of cream cheese and thick (double cream).

Enjoy!!