Saturday, May 20, 2006

Mussels Cooked in Coconut Milk

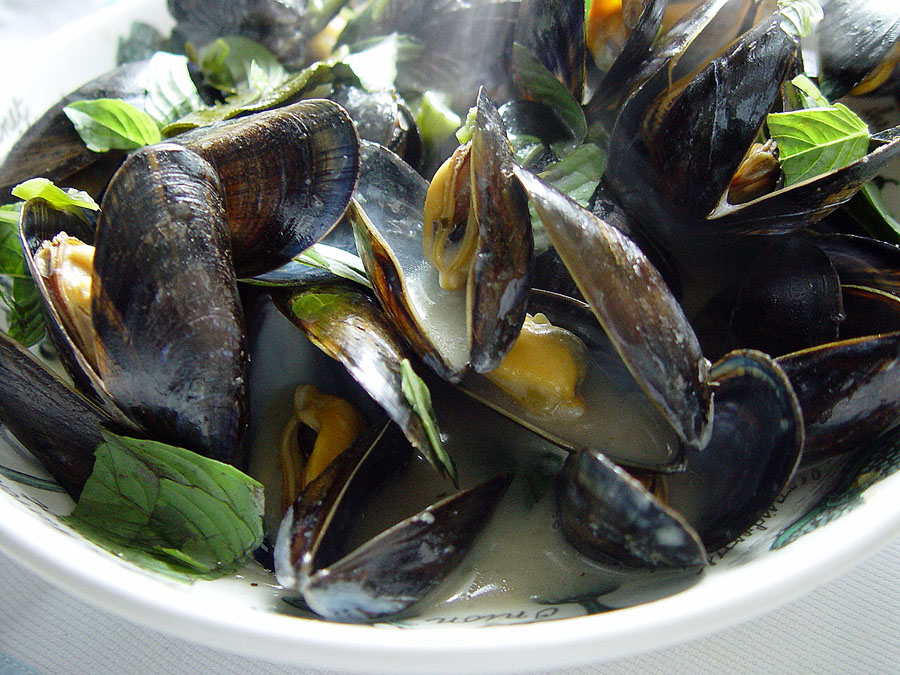
I love mussels. Well, I love most things ‘sea food’. I have a really good fishmongers where I always go to and I buy the mussels already cleaned up. It’s such a treat. Today I went over for vongoli but there was none left so I ended up once again with mussels. Oh, too bad!!

I decided that I would prepare it with coconut milk. Great combination. Plus a selection a ingredients which say ‘thai’ all over. The result was a really lovely dish, with a beautiful aroma. I had 400g all to myself. It is true that once you discount all the shells you are not left with much substance as it were. I don’t care however. It is all so wonderful


1.5 kg fresh mussels

2 fresh lemon grass stalks

1 x 400ml tin of coconut milk

3 tablespoons water

3 kaffir lime leaves or 1 tablespoon shredded lime zest

2 tablespoons coarsely chopped spring onions

1 tablespoon Thai green curry paste

3 tablespoons chopped coriander roots or stalks

2 tablespoons fish sauce (nam pla)

1 teaspoon sugar

A large handful of fresh Thai basil leaves or ordinary basil leaves, shredded

Often the fishmonger sells the mussels already cleaned up. If not, clean them before using in the recipe.

Peel the tough outer layers of the lemon grass stalks, leaving the tender whitish centre. Cut it into 7.5cm pieces and crush with the flat of a heavy knife.

Pour the coconut milk and water into a wok or large frying-pan. Add the lemon grass, lime leaves or zest, spring onions, curry paste, coriander roots or stalks, fish sauce and sugar and bring to a simmer.

Add the mussels, then cover and cook over a high heat for 5 minutes, until all the mussels have opened (discard any that remain closed). Give the mixture a final stir, add the basil leaves and sever at once.

Chicken with Okra

I grew up eating this dish .Not every day obviously but with a certain regularity. In Brazil some people are a bit weary of okra as if not looked after properly it can ‘dribble’. Yes, dribble. That unpleasant, sticky, liquid thing that runs out of one’s mouth when we are a bit tired and doze off unexpectedly. However, if the okra is slightly fried before being thrown into a stew or something like it, it will not ‘dribble’. An American friend once challenged me in front of a lot of people saying that it was not true. That there was no way we could avoid the sticky, unpleasant goo we got when putting okra together with some sort of liquid. Well, I did not spend my evening trying to convince him that he was wrong. After all if some people think that they hold the goblet of truth so be it. I do tell you though that that is the right way to avoid that sticky goo.

I made this lovely recipe by Fran from Flavour which has fried okra as it main ingredient. I told Fran that I would post the Brazilian recipe of okra. So here it is. Sometimes I ate this dish in a sort of stew-style dish but mine is more subdued. If you want more sauce I would dare say that you should add some chicken stock to the chicken as soon as the onions are added.

2 kg chicken breasts cut into medium sized pieces

½ cup vegetable oil

3 big onions, chopped

1 teaspoon of ‘mineiro’ seasoning**

1 kg okra, cut into small round slices

‘Mineiro’ seasoning

500g onions

200g garlic

2 green peppers

1 bunch of parsley (flat leaf)

1 bunch of chives

Put all the ingredients above in a blender. Whiz it with sal to taste and remove it when it reaches paste consistency.

Heat half the oil in a saucepan and throw the chicken in, mixing until it reaches a golden colour and are cooked through. Add the onions and enough ‘mineiro’ seasoning to add flavour to the chicken, cooking in slow heat.

In a separate pan heat the remaining oil and throw the okra in. Mix it all the time until it is fried. When ready remove from the pan and put on a plate with some kitchen towel on it.

When the chicken is nearly ready throw the okra in and let it cook for a bit longer.

Serve it outright.

In Brazil we serve it with something similar to polenta.The Portuguese name is ‘Angu’ and its ingredients are cornflour and water. I have never been a big fan of angu anyway so I eat it with rice.

Beautiful Carrot and Peanut Salad


I remember the first time I came across this salad. It was in Nigella’s Forever Summer book. Carrots are such beautiful looking things. Fell in love and said to myself ‘must give it a go’. The recipe is originally entitled ‘The Rainbow Room’s Carrot and Peanut Salad’ in case you look for it. In the book you can read about the recipe and its place in Nigella’s life. I won’t go into that. I just love the simplicity of its ingredients, its crunchiness – there is an awful lot of chewing there, the amazing taste and texture that the peanuts add to it in conjunction with the carrots. If you like it a repeat will be no trouble. The red wine vinegar in the sauce might sound a bit strange but go beyond the initial reaction as it plays an important role in the lovely end-result.

One thing that I want to recommend is that the carrots are grated coarsely or that you cut them in chopstick thickness. I believe very strongly that this salad doesn’t work well if you just grate the carrots finely as a lot of the texture will be gone.

4 medium carrots peeled and coarsely grated or cut into chopstick shape

75g salted peanuts

2 tablespoons red wine vinegar

2 tablespoons groundnut oil

Few drops sesame oil


Throw the carrots in a salad dish followed by the peanuts and give it a good mix. In a separate container add the vinegar, groundnut and sesame oil. Pour it over the salad and just have a good time chewing away. Crunch, crunch…

Monday, May 15, 2006

Passion Fruit, poppy seeds and almond cake


This is a lovely and pretty looking cake. Wonderful for afternoon tea. I never have time for a nice afternoon tea session during the week as I am at work. The max I do is grab a cup of Earl Grey tea from the cafeteria. If I’m lucky I might be able to pinch a Digestive from one of my colleagues. So I have an obsession with setting up lovely afternoon tea sessions. In my dream afternoon tea land I chose this cake to have with a cup of Breakfast tea – I know it is afternoon

When I originally saw the amount of poppy seeds required I suspected that there might have been a typo. It turned out to be just right as they will dot the cake in a very charming way. Fancy a slice?


6 tablespoons of poppy seeds

¼ cup of milk (60ml)

180g butter, room temperature and softened

180g caster sugar

3 large eggs

240g plain flour

½ cup flaked almond

½ cup passion fruit juice, strained through a sieve (120ml)

1 tablespoon baking powder

Icing:

90g caster sugar

160ml passion fruit juice

80ml water

Grease and flour a 22.5 cm wide bundt pan. Reserve.

Pre-heat the oven – 180oC. Put the poppy seeds in a small bowl and cover them with the milk. Leave it for 20 minutes.

Put the butter and sugar in a bowl and beat it until the mixture is pale and creamy. Add the eggs, one at a time, beating well after each addition. Fold in the almonds and the poppy seeds with milk. Then add the flour and passion fruit juice intercalating them. Add the baking powder last.

Put the mixture in the prepared baking tin and bake for approximately 35 minutes. Let it cool in the tin for approximately 5 minutes before removing it from the tin.

In the meantime prepare the icing by mixing the sugar and passion fruit juice and then gradually adding the water until you reach the desired consistency. Pour over the cake whilst it is still hot/warm.

Saturday, May 06, 2006

Rosewater Madeleines


Sometimes I bake to relax, to stop my mind from spinning round full of thoughts. Flicking through some of my books I came across a recipe that truly got me curious: madeleines with rosewater. Madeleines are such lovely, gentle creations anyway. I like calling them sponge biscuits. The rosewater seemed such a wonderful touch. That made my mind for me. I tried to imagine how I would have felt if I had been served them with tea. And the thought filled me with warmth. There is something about rose water and what it invokes. The danger is that I can never stop eating madeleines when I make them. There is a lot of self-restrain that needs to be exercised.Oh well, life is tough sometimes.

With regards to the recipe, I followed it to the letter. I would like to say that the tablespoon of melted butter to grease the tin seemed a bit much. I had loads left out. I also recommend that you do not fill the tins to the top as the madeleines rise quite significantly.

If you want to recreate them here’s the recipe and steps to follow:

50g unsalted butter, plus 1 tablespoon for greasing

1 large egg

40g caster sugar

Pinch of salt

45g plain flour, preferably Italian 00

1 tablespoon rosewater

Icing sugar for dusting

24-bun mini-madeleine tin

Melt all the butter over a low heat, then leave to cool. Beat the eggs, caster sugar and salt in a bowl for about 5 minutes, preferably with an electric mixer of some sort, until it’s as thick as mayonnaise. Then sprinkle in the flour; you can use a sieve above the egg and sugar mixture, put the flour in and then shake it through. Fold in the flour with a wooden spoon and then set aside a scant tablespoon of the cold, melted butter for greasing the tins and fold in the rest along with the rosewater. Mix well, but not too vigorously. Leave to rest in the fridge for 1 hour, then take out and leave at room temperature for half an hour. Pre-heat the oven to 220oC/ gas mark 7.

Brush the insides of the madeleine tins with the butter set aside before filling them with the mixture. It should be about 1 teaspoon for each mould – not full by any means. Bake for 5 minutes, though check after 3. When ready turn out and let cool on a rack, then arrange on a plate and dust with icing sugar.

Makes about 48.

Tuesday, May 02, 2006

Cloverleaf Honey-Wheat Rolls

I have made this recipe so many times - which is something that I am not very used to doing. I often do not get a chance to repeat a certain recipe as I tend to be in look out for new recipes most of the time. However these rolls are so delicious and pretty easy to make. Always a sure winner. I love them with soup or just buttered whilst still hot. This time round I used spelt flour instead of whole wheat flour. I was pretty happy with the result. The rolls were so deliciously soft. also decided to sprinkle half of them with poppy seed after glazing them with a mixture of single cream and water - as opposed to the egg wash suggested in the recipe. Apart from that I pretty much stick to the original. I got the recipe from Anna who has the blog Kitchenspace. Click here to see the original post with the recipe and Anna's comments.

Monday, May 01, 2006

Fried Okra


I grew up eating okra/lady fingers but always in stews. Never fried. When I read a post in Flavors where Fran tells us about these fried okras I thought to myself, ‘I have to try it’. I just get curious about different ways of preparing things. From when I read the post to when I finally got round to preparing the dish it was quite some time. However, it was worth the wait. Even though I did not have enough cornmeal lying around in order to coat my okra well enough as I saw that Fran did, it still turned out great. It is a completely different texture from the one I was used to, and the crunchiness is great. I also particularly liked the combination of flavours: the tomato, the peppers, the spring onions and the bacon. I had the dish all to myself – I made 125g. Hands up, guilty of gluttony. Please click here for the original recipe from Fran.

And Fran, a big thank you for the recipe. I have already passed them on to a few fellow Brazilians who like me had not eaten fried okra before.

Chocolate Raspberry Pavlova


Up to quite recently you wouldn’t catch me preparing Pavlova in a million years. I remember kiwis and Aussie mates of mine arguing about which country had come up with palvlovas but could not understand what the fuss was all about. I was flicking through a Nigella’s cookery book in search of a nice desert to make for a good friend and thought that the look of this Chocolate Raspberry Pavlova was just stunning. From where I was standing all those gorgeous contrasting colours made even me want to take a bite. It was not like the ordinary Pavlovas I had seen before, with their pale look. This one had the dark of the chocolaty base, the white of the cream and the red of the berries. Winner combination of colours. I have to admit to have even taken great pleasure out of eating it – it is crunchy on the outside but slightly soft in the inside and very chocolaty. To top it all up you have the softness and slight tanginess of the raspberries which break a bit with the sweetness of the dessert. I was really please with the outcome.

For the chocolate meringue base:

6 egg whites

300g caster sugar

3 tablespoons cocoa powder, sieved

1 teaspoon balsamic vinegar or red wine vinegar

50g dark chocolate finely chopped

For the topping:

500ml double cream

500g raspberries

2-3 tablespoons coarsely grated dark chocolate

Pre-heat the oven to 180oC/gas mark 4 and line the baking tray with baking parchment.

Beat the egg whites until satiny peaks form, and then beat in the sugar a spoonful at a time until the meringue is stiff and shiny. Sprinkle over the cocoa and vinegar, and the chopped chocolate. Then gently fold everything until the cocoa is thoroughly mixed in. Mound on to a baking sheet in a fat circle, approximately 23cm in diameter, smoothing the sides and top a bit. Place in the oven, then immediately turn the temperature down to 150oC/gas mark 2 and cook for about one to one and a quarter hours. When it is ready it should look crisp around the edges, slightly cracked in parts, and dry on top, but when you prod the centre you should feel the promise of squidginess beneath your fingers. Turn off the oven and open the door slightly, and let the chocolate meringue disc cool completely.

When you are ready to serve, invert on to a big, flat-bottomed plate. Whisk the cream till thick but still soft and pile it on top of the meringue, then scatter over the raspberries. Coarsely grate the chocolate - I used a vegetable peeler to get some thin strands.