Thursday, June 14, 2007

Lemon polenta cake - gluten free

This cake was originally picked to take part in the Weekend Cookbook Challenge organized by Sara from I like to cook, this time round held by Ani from Foodie Chickie. The theme was cornmeal. Unfortunately I have been doing quite long hours and tiredeness got the best of me and I fell asleep before baking the cake to meet the deadline - I only found out about the event one day before the deadline. The ones of you who have visited my blog have read this before. I still have hopes that my work won’t have such impact on my life as it does. At least not by sending me too sleep just like that.
Back to the cake, as the recipe had already been selected I decided to go ahead with it. After all polenta/cornmeal cakes are such winners in my experience. Plus this one had such appeal with all the lemon juice and rind. Plus the fact that it is gluten free.
Looking back I am ever so happy that I didn’t give up on it. Shame that it didn’t manage to be included in the event. It is a very light and refreshing cake. I brought it to work - I am posting it from work, and it did not last long. Wonderful treat for an afternoon tea or even for a moment of hunger or pure indulgence. Plus all the people who need to have gluten free cake can eat this most yummy treat as well.

Lemon polenta cake – gluten free

280g butter, room temperature ( I only used 250g)
225g sugar
6 eggs separated
175g ground almonds
115g yellow cornmeal or polenta


Rind and juice of 4 lemons
Icing sugar to dust

Greased round baking tray – 25cm + line it with baking parchment

Preheat the oven – 180oC/fan assisted 160oC.

Beat the butter and sugar until pale and creamy. Approximately 3 minutes. Add the egg yolks, one at a time, beating well after each addition.
Then add the ground almonds, polenta/yellow cornmeal, lemon rind and juice. Mix well using a wooden spoon.
Beat the egg whites until it forms hard peaks. Using a metal spoon incorporate the egg whites to the mixture and bake for a good 50 minutes. Test inserting a skewer in the middle of it to check that the cake is cooked – it needs to come out clean. Remove from the oven and let it cool in the rack. Dust with icing sugar.

Wednesday, June 13, 2007

Couscous salad with chickpeas and goat’s cheese

This week’s Weekend Herb Blogging event, that great idea that Kalyn had, is being held by Karen from the beautiful and inspiring blog Rachel’s bite.

I have not prepared this recipe with the event in mind, In fact I did have another recipe that I really wanted to post. I just picked it out of a book on Moroccan dishes. However, when I tasted it I thought that it would be a mistake not to use t his recipe.It has so many Maroccan elements to it.

It is very seasonal in that it will go very well in a summer day, when one sometimes does not feel like standing the stove heat for long. You prepare it very quickly and it is a meal in itself. Plus it it full of goodness. And, nearly forgot that, looks great too. Golden sun colour because of the turmeric, plus the other beautiful reds, greens and white. Next time I prepare it I might add some diced dried dates.


aaWeekendHerbBlogging

Couscous salad with chickpeas and goat’s cheese

3 tablespoons olive oil

1 large onion, peeled and chopped

2 cloves garlic, crushed

1 teaspoon turmeric

½ teaspoon cinnamon

1 ½ cups chicken stock ( or vegetable stock for a vegetarian version)

1 ½ cups couscous

420g chickpeas, cooked and peeled

150g goat’s cheese, crumbled

2 red peppers, seeds removed and roasted in the oven

Juice of 1 lemon

3 tablespoons each chopped mint and parsley

Sea salt and freshly ground black pepper

1 preserved lemon

  1. Heat the oil in a large saucepan, add onion and cook over a medium heat for 5 minutes to light brown. Add crushed garlic, tumeric, and cinnamon, and cook for another 30 seconds, then add stock and bring to the boil

  1. Stir in the couscous, then remove pan from the heat, cover and leave to steam for 10 minutes to soften. Remove covering and fluff up couscous with a fork. Set it aside to cool

  1. Toss through the remaining salad ingredients, except preserved lemon, and season well with salt and pepper to taste

  1. Remove flesh from preserved lemon and discard. Rinse the rind with cold water. Finely slice rind and scatter over finished salad to garnish

Sunday, June 10, 2007

Beijinho de coco for Meeta


I wanted to bake something special for Meeta’s birthday, for her birthday mingle. Something Brazilian.

Me being me I left it till the last minute to bake this lovely Brazilian cake, Ant’s hill cake. It is a cake with coconut milk and little chocolate bits. Delicious. Mum used to make it for me. Unfortunately the cake sunk in the middle, to my total disappointment. It was then too late to bake something else.

However, as soon as I had some free time I went back to the task. I know that the mingle is well over so I am doing this isolated post.

I chose a sweet which is very common in children’s birthday parties – coconut kiss. If you ever go to a Brazilian birthday party – for children it is, you will find loads of little bite-size sweets similar to these. They will vary in the ingredients: chocolate, Cashew nut, strawberry, prunes..They are made by hundreds. The birthday table is nicely decorated with all those beautiful sweets, very well presented.

You might not know but Brazilians are very good and into making lovely bite-size sweets for birthday parties, weddings, christenings. We inherited that from the Portuguese who colonised us. They really liked sweets. Very sweet ones. That was inherited from the Moors who dominated the Iberian Peninsula for a very long time.

The Portuguese brought sugar cane from the Madeira Islands and planted them in Brazil. The Portuguese sweets tradition acquired many tropical characteristics.

The rich landowners’ wives and daughters used to prepare lovely little sweets to give as presents. They would be given to relatives, friends, even to loved ones. They would always be beautifully presented. We keep this tradition to this date. The names they take are quite often affectionate ones: ‘coconut kisses’, ‘little caresses’, and ‘kisses’.

This one sweet I chose is made out of condensed milk and desiccated coconut. Its preparation is very simple and the great appeal is in the way it is presented. As I am living abroad I cannot always put my hands on lovely cases and wrappings to truly demonstrate how we do that.

Coconut kiss


1 can condensed milk

1 tablespoon butter

4 tablespoons desiccated coconut

Cloves

More desiccated coconut to coat the sweets


Put the condensed milk and butter in a pan over low fire. Keep stirring it until the mixture thickens and you can see the bottom of the pan. Approximate 10 minutes. The consistency you want is not too soft – or you can’t roll the little balls, nor too thick – or the little balls will be too hard. When you reach the right consistency remove it from the fire and throw the 4 tablespoons of desiccated coconut inside the pan. Mix it some more so that it is all incorporated. Pour the mixture on the plate and let it cool. When it is cool roll little balls with it, bite size, and roll them over the desiccated coconut. Stick a clove in the middle and put it in a little case. Repeat it until the whole mixture is dealt with.

If you wish you can make a little indentation in the middle and put ‘dulce the leche’ in it.

graviola flan

click to enlarge

Some of you or many even, might not be familiar with the fruit ‘Graviola’. I believe that in the Spanish speaking countries of the Americas it is know as guanabana.Graviola is how we know it in Brasil. Mind you, not all over Brasil because it is native to the north and in the rest of the country not everybody is familiar with it. Nowadays we also find it in central Brasil – I recently saw it in a market near Brasilia which is where my mum lives. I was fortunate enough to grow up drinking a lot of graviola juice. Brasilians as most latin americans that I know love their fruit juice. I am no longer in my twenties, let alone thirties, so that gives you an idea of how popular fruit juice has always been back in my home country. Ops, I have gone on a tangent. Sorry! Back to Graviola.

I was quite surprised myself to find some info about Graviola in a site about alternative cancer treatments. Read here if you would like to find out more.

Moving away from the medicinal side, I always loved it because it is so refreshing. I remember that one of my cousins always used to pick the ripe ones from her back garden and would prepare juice, desserts... When I was home last year I made a lovely flan with it. And boy it was refreshing.

As we can find it abroad in the form of frozen pulp I have decided to publish its recipe here as well. Any stores that sell Brasilian products, including frozen pulps, will have graviola pulp amongst the various flavours sold. Just ask. I also believe that in North America you might be able to find it in stores where they sell produce from Latin American countries as it is a fruit found in many other countries. I found this company from Ecuador for instance - look here.

The condensed milk ingredient makes it so Brasilian in the sense that we use condensed milk an awful lot in sweet dishes. As for the pulp, if you are lucky enough to find the fruit near where you live, you will need to blend it and push the contents through a sieve before adding it to your recipe. If you are using the pulp there is no need for that. It is a recipe put together very easily and lovely for the hot summer days.


Graviola flan

1 can of condensed milk

2 ¼ cups of graviola pulp

6 gelatine leaves or 1 packet of powder gelatine

1 starfruit cut into slices

A bit of Drambui liqueur

Hydrate the gelatine by putting it in cold water for five minutes. Then squeeze the excess water and dissolve it in Bain Marie. Put the condensed milk and the pulp in the blender and give it a good whiz. With the blender still on gradually add the dissolved gelatine. After that transfer the mixture to flan containers which would have been previously put in cold water. Sprinkle the poppy seeds before putting the containers in the fridge for a good 4 hours at least. Before serving prepare a nice sauce with Drambuí liqueur.

We just made it by putting equal measure of water and sugar in a pan. When the sugar dissolves lower the heat and continue stirring until it starts to thicken. Take it off the fire and add a splash of Drambuí liqueur.

Drizzle it over the flan and decorate it with the star fruit slices.

Thursday, June 07, 2007

Linguine with clams and tomatoes

Pasta is such a great thing to cook.Very versatile - all the possible sauce combinations. I chose this dish to take part in Ruth's Presto Pasta Nights events. Check here for the details. I actually first emailed Ruth about a month ago or more saying that I really wanted to take part in these events. Only now I managed to get organized.

I love sea food and since the first time that I saw this recipe I decided that I had to prepare it - the lovely clams! With all the lovely and fresh ingredients this is such a fabulous dish. not too laborious, extremely delicious and gets ready in no time.


I hope you enjoy it as much as I did.


Linguine with clams and tomatoes

400g italian dried linguine

60ml extra virgin olive oil

3 garlic cloves, finely sliced

2 small fresh red chillies, finely chopped, or ½ teaspoon dried chilli flakes

Sea salt

1 kg clams

125ml white wine

500g cherry tomatoes, cut into halves

3 tbspoons finely chopped fresh parsley

Freshly ground paper


Cook the linguine in a large saucepan. Whilst it is cooking, heat the olive oil in a large frying pan over a medium heat. Add the garlic, chilli and sea salt for 1 minute. Add the clams, white wine and tomatoes. Cover the pan and cook for 3 minutes, or until the clams open. Remove from the heat.


Drain the pasta and add to the frying pan with the parsley. Gently toss to combine, then season with the salt and pepper.

Saturday, June 02, 2007

Nana Maria canjica


My grandmother on my mother’s side, Dona Maria, was originally from the state of Paraíba, in the north east of Brazil. In that part of the country corn plays a very important part in people’s diet. It is done in various forms: raw corn that is grated and then cooked, Brazilian corn flour – which is very fine, pre-cooked corn flour. The list is long.

Nowadays we find corn in most parts of the country nearly all year round, but in my nana’s days and in her region it would be very abundant around Easter time. And she was famous for making canjica and pamonha - both are corn based dishes. You are probably saying to yourself: what the heck is she going on about. Canjica (known in the south of Brazil by the name of curau) is made using grated corn that is cooked with milk and sugar. It is sprinkled with cinnamon powder when ready and put in the fridge to cool. Pamonha is a bit more laborious: the corn is also grated, and then the kernels are scraped to extract any remaining bits as well as the juices; the pulp is seasoned , strained and it is used to fill the corn husks which will become little filled parcels; pamonhas can be sweet or savory. In the part of Brazil where I spent my adolescence and where I lived until I came to Europe, pamonha is nearly a religion. Back to my nana, she used to add coconut milk to her recipes. She would grate the coconut and then extract the milk to be used in her cooking.

Since we are now in the month of June, and all over Brasil a national festivity starts, lasting nearly the whole month – Festa Junina, and canjica ( curau) is eaten nearly everywhere, I have chosen to post my grandmother’s recipe here as a toast to the month of June. This is the nicest part of the Brasilian calendar year to me. There are loads of special foods that we eat specially at the festivities that happen everywhere. You can read a bit about this festivity here.

.I

Nana Maria Canjica Recipe


4 medium-sized corns

½ cup milk

½ cup coconut milk

Sugar – to your taste

Cinnamon powder

Grate the corns and then push the pulp through a sieve. If you feel that the pulp is very coarse, before pushing it through the sieve put it in a blender with a bit of the ½ cup milk and give it a good whiz. You want it to be really mushy. Now push it through a sieve. Transfer the sieved corn to a heavy bottomed pan, adding the milk and some of the coconut milk. Put the pan on a medium heat and add sugar to the mixture so that it is to your taste. Stir the mixture until it thickens a bit, pouring the remaining coconut milk little by little – this is to avoid that your canjica is not too runny. When you reach the right consistency, like thickish porridge, remove the pan from the fire, transfer the mixture to various ramekins, or even to one big dish, sprinkle with the cinnamon and let it cool. Once cooled transfer it to the fridge for at least one hour so that it gets cool. Lovely on a summer day.

Please note that when you grate the corn, if you feel that the amount you have might not be enough to all the hungry mouths you will be feeding, just grate more corns. Depending on the size of the original corns, the amount might not be enough. As for the milk and sugar, just add more accordingly. It might sound complicated but it is dead easy. I promise.


Monday, May 28, 2007

The Gateau Saint Honore Challenge


The Daring Bakers in action once again. This time the challenge has been shared by Helen and Anita. The challenge chosen was the Gateau Saint Honore.Some very good reasons why it was chosen:

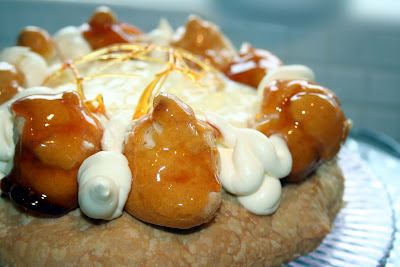
Turns out that May 16th is Saint Honore (pronounced o-no-ray) Day, patron Saint of pastry chefs and bakers. It also turns out that there is a very traditional cake named after him: Gateau Saint Honore. It is the “must pass” element of pastry school students and it is a cake that includes several elements and techniques that bakers should try at least once: puff pastry, cream puff dough, caramel and pastry filling. There are many fillings as they are bakeries: chiboust cream, pastry cream, Bavarian cream (aka Diplomat cream). The cake building goes like this: - base of puff pastry - rings of cream dough baked on top (so that the cream sticks) - cream puffs set on the pastry filling or hooked to the base with hot caramel - cream filling to fill everything

I really enjoyed this challenge. When I finished it I had a great feeling of accomplishment. I managed to laugh at my faults and made note to self to work on improving them. Most of all I felt really pleased about my accomplishments. And believe me, I am the type of person who can really focus on my mistakes. So definitely a fabulous result. The cake does not look like it should but it was my best shot. Thank you Helen and Anita for organizing and for picking the challenge.

As a piece of patisserie I don’t really like Gateau Saint Honore. I find it really busy, there is a lot going on. However, once it is broken down into parts it does give me immense pleasure – or rather, it did. The Saint Honore Cream is so delicious. I could barely stop picking on it. I followed it to the letter with the exception of the Cointreau liqueur. I had one too many spoonfuls so many times. I wonder what it will go well with since I still have some of it in the fridge. I also loved making the puff pastry because had it not been for the challenge I would not have made it anytime soon. I was always a bit scared of it. It is true that it requires a bit of elbow grease but hey..I felt good once it was done. Also had a laugh with the funny shapes of my piped dough. Need to work on that. The caramel was something else that terrified me. I foresaw, in my dramatic nature, burnt fingers and hand. In the end I did survive it and even managed to play with it at the back of a ladle.

The only thing I did not make this time was the puff pastry. As I have already made it in the past I went for the store bought one – as Helen said it was Ok.

Please accept my apologies for posting only today. Since I spilt some red wine on my key board a few months ago on top of having to buy a brand new keyboard as the other one never recovered from the trauma, I also had to deal with a laptop that would switch itself off just like that. And yesterday it did it again. All of a sudden: puff. Only difference was that this time it would not switch itself back on. I have managed to borrow a friend’s laptop today so here I am, finally posting my cake.

I would suggest you visit the other Daring Baker's sites to see their creations. The sites are listed on the bar on the right hand side.

I will post the recipe as published by Helen, with the exception of the puff pastry. Here it goes:

Pate a Choux – Cream Puffs Dough

4 ¾ oz. all purpose flour (135 gr)
1 cup water ( 240 ml)
2 oz unsalted butter (58 gr)
¼ tsp. salt (1 gr)
1 cup eggs (240 ml)

Sift the flour and set aside.
Heat the water, butter and salt to a full rolling boil, so that the fat is not just floating on the top but is dispersed throughout the liquid.
Stir the flour into the liquid with a heavy wooden spoon, adding it as fast as it can be absorbed. Avoid adding it all at once or it will form clumps.
Cook, stirring constantly and breaking up the lumps if necessary, by pressing them against the side of the pan with the back of the spoon until the mixture comes away from the sides of the pan, about 2-3 minutes.
Transfer the dough to a mixer bowl. Let the paste cool slightly so that the eggs will not cook when they are added. You can add and stir the eggs by hand but it requires some serious elbow grease.
Mix in the eggs, one at a time, using the paddle attachment on low or medium speed. Do not add all the eggs at once. Check after a few, the dough should have the consistency of thick mayonnaise.
Transfer the dough to a piping bag and use as desired.

Pate Feuillete – Puff Pastry:

Makes about 2 1/2 pounds.
3 cups all-purpose flour, plus more for work surface (420 gr)
3/4 cup cake flour (105 gr)
1 1/2 teaspoons salt (7 gr)
4 tablespoons unsalted butter, cut into 1/2-inch pieces, well chilled (60 gr)
1 1/4 cups cold water (295.5 ml)
1 tablespoon all-purpose flour (14 gr)
1 3/4 cups (3 1/2 sticks) unsalted butter, well-chilled (405 gr)

1/ Make the dough package: In a large mixing bowl, combine both flours with the salt. Scatter butter pieces over the flour mixture; using your fingers or a pastry cutter, incorporate butter until mixture resembles coarse meal.
2/ Form a well in center of mixture, and pour the water into well. Using your hands, gradually draw flour mixture over the water, covering and gathering until mixture is well blended and begins to come together. Gently knead mixture in the bowl just until it comes together to form a dough, about 15 seconds. Pat dough into a rough ball, and turn out onto a piece of plastic wrap. Wrap tightly, and place in refrigerator to chill 1 hour.
3/ Make the butter package: Sprinkle 1/2 tablespoon flour on a sheet of waxed or parchment paper. Place uncut sticks of butter on top, and sprinkle with remaining 1/2 tablespoon flour. Top with another sheet of paper; using a rolling pin, pound butter to soften and flatten to about 1/2 inch. Remove top sheet of paper, and fold butter package in half onto itself. Replace top sheet of paper, and pound again until butter is about A inch thick. Repeat process two or three times, or until butter becomes quite pliable. Using your hands, shape butter package into a 6-inch square. Wrap well in plastic wrap, and place in refrigerator until it is chilled but not hardened, no more than 10 minutes.
4/ Assemble and roll the dough: Remove dough package from refrigerator, and place on a lightly floured work surface. Using a rolling pin, gently roll dough into a 9-inch round. Remove butter package from refrigerator, and place it in the center of the dough round. Using a paring knife or bench scraper, lightly score the dough to outline the butter square; remove butter, and set it aside. Starting from each side of the center square, gently roll out dough with the rolling pin, forming four flaps, each 4 to 5 inches long; do not touch the raised square in the center of the dough. Replace butter package on the center square. Fold flaps of dough over the butter package so that it is completely enclosed. Press with your hands to seal.
5/ Using the rolling pin, press down on the dough at regular intervals, repeating and covering the entire surface area, until it is about 1 inch thick. Gently roll out the dough into a large rectangle, about 9 by 20 inches, with one of the short sides closest to you. Be careful not to press too hard around the edges, and keep the corners even as you roll out the dough by squaring them with the side of the rolling pin or your hands. Brush off any excess flour. Starting at the near end, fold the rectangle in thirds as you would a business letter; this completes the first single turn.Wrap in plastic wrap; place in refrigerator 45 to 60 minutes.
6/ Remove dough from refrigerator, and repeat process in step 5, giving it five more single turns.Always start with the flap opening on the right as if it were a book. Mark the dough with your knuckle each time you complete a turn to help you keep track. Chill 1 hour between each turn. After the sixth and final turn, wrap dough in plastic wrap; refrigerate at least 4 hours or overnight before using.

Saint Honore Cream (Rapid Chiboust or Diplomat Cream)
1 envelope unflavored gelatin (7 gr.)
1/4 cup cold water (60 ml)
1/2 cup + 2 Tablespoons sugar (130 gr)
½ cup all-purpose flour (70 gr)
1/4 teaspoon salt
5 egg yolks
2 cups whole milk (500ml)
1 Tb. rum
¼ cup whipping cream (57 gr)
3 egg whites
dash of salt
1/2 cup sugar (105 gr)

Soak the gelatin in the 1/4 cup of cold water.
Put the sugar, flour, and salt into a saucepan and stir together with a whisk. Add the yolks and enough milk to make a paste. Whisk in the remainder of the milk.
Place over low heat and stirring constantly, cook until thick. Remove from heat and stir in the vanilla and the gelatin. Stir until the gelatin is completely dissolved.
Stir in the whipping cream.Set the mixing bowl in cold water and stir until the cream is cool. Place the egg whites in a clean bowl and using clean beaters, whip them with the dash of salt. As soon as the whites begin to stiffen, gradually add the 1/2 cup of sugar and beat until they are very stiff. Fold the egg whites into the cooled cream.

Caramel:
8 oz sugar (240 gr)

Assembly:

Roll the puff pastry out to 1/8 inch (3 mm) thick, 12 inch square (30 cm). Place on a sheet pan lined with parchment paper. Refrigerate covered at least 20 minutes.
While the puff pastry is resting, make the pate a choux and place it in a pastry bag with a # 4 (8mm) plain tip. Reserve.
Leaving the puff pastry on the sheet pan, cut a 11 inch (27.5 cm) circle from the dough and remove the scraps. (An easy way to cut it is to use a 11inch tart pan as a “cookie cutter”). Prick the circles lightly with a fork.
Pipe 4 concentric rings of Pate a Choux on the pastry circle. Pipe out 12 cream puffs the size of Bing cherries onto the paper around the cake.
Bake the puff pastry circle and the cream puffs at 400F (205C) until the pate a choux has puffed, about 10 minutes. Reduce the heat to 375F (190C) and bake until everything is dry enough to hold its shape, about 35 minutes longer for the cake and 8 minutes longer for the cream puffs (just pick them up and take them out as they are done)
Place about 4 oz (114 gr) of the Saint Honore Cream in a pastry bag with a #2 (4mm) plain tip. Use the pastry bag tip or the tip of a paring knife to make a small hole in the bottom of each cream puff. Pipe the cream into the cream puffs to fill them. Refrigerate.
Spread the remaining cream filling on the cake. Refrigerate for at least 2 hours to set the cream.
Caramelize the 8 oz. of sugar:
Fill a bowl that is large enough to hold the pan used for cooking the sugar with enough cold water to reach halfway up the sides of the pan. Set the bowl aside.
Place the sugar in a heavy bottomed pan and cook until the sugar until it has caramelized to just a shade lighter than the desired color.
Remove from the heat and immediately place the bottom of the pan in the bowl of cold water to stop the cooking process.
Dip the cream puffs into the hot caramel, using 2 forks or tongues to avoid burning your fingers. Place them on a sheet pan. The caramel must be hot enough to go on in a thin layer. Reheat if necessary as you are dipping, stirring constantly to avoid darkening the caramel any more than necessary. Also, avoid any Saint Honore cream to leak out of the puffs and get mixed in with the caramel while dipping as the cream can cause the sugar to recrystallize.
Whip the one cup of heavy cream and teaspoon of sugar to stiff peaks. Place the whipped cream in pastry bag fitted with a #5 (10mm) star tip. Pipe a border of whipped cream around the top of the cake. Arrange the cream puffs, evenly spaced, on top of the filling, next to the cream.

Put it in the fridge for a couple of hours before serving.

Saturday, May 26, 2007

Madeleines with buckwheat flour


I was in France recently and on the way back I grabbed a magazine which had an article with a Breton chef called Olivier Bellin. He has received an award as a sort of ‘young revelation’. He has made buckwheat flour as the centre of his cuisine. Buckwheat flour, blé noir, was until the 19th century, one of the staple foods of Brittany and Normandy. They used to make buckwheat porridge in Normandy – the flour would be soaked either in curdled skimmed milk or in plain water and then stirred in a pan over the heat. There was an article in April ‘Saveur’about Brittany crêpes, which are made with buckwheat. Olivier uses buckwheat flour not only in his crêpes, but in things such as madeleines and crème brulées.

I am fascinated by people who take ingredients to a different level. Local ingredients, most importantly. I feel that people tend to look elsewhere for the greener grass, the more interesting view. And many times there is equal beauty and value in our backyard.

As I had never, ever cooked/baked with buckwheat flour I decided to buy a bag and give it a go. Amongst many things, it is gluten free. I elected Olivier’s ‘madeleines au blé noir’. I have already made madeleines before – with rosewater and also with orange rind, but never with buckwheat. I was dead curious to give this recipe a go. The recipe has to be prepared at least 12 hours before baking (don’t try to rest it for less than 12 hours). Oh, and it is well worth the wait. I loved the madeleines. They have a sun tanned look about them and a sort of nutty flavour because of the browned butter. They taste rather special. And very, very good. I took half the recipe to work and they went just like that. I also gave another 1/3 of the recipe to a French friend who is not too keen on madeleines in general, and she just loved these. She said that she will be in the look out for buckwheat madeleines from now on.

Madeleines with buckwheat flour

65g buckwheat flour

150g icing sugar

35g almond flour

5 egg whites

150g butter – unsalted

1 teaspoon honey


Melt the butter until it turns into ‘browned butter’. Transfer it to a bowl and mix it with the honey. Let it cool. In the meantime put the flour – almond and buckwheat, together with the sugar in a big mixing bowl. Mix the egg whites lightly with a fork, until they just begin to froth. Transfer the egg whites to the bowl with the dry ingredients and mix them using either a fouet or a wooden spoon. Once the butter is cool add it to the batter as well and mix it a bit more. Cover the mixture and put it in the fridge for 12 hours at least. No less than that. It works well if you leave the batter to rest overnight and bake the madeleines for breakfast.

Pre-heat the oven – 180oC/160oC fan assisted ovens. Prepare the Madeleine moulds – I used small ones and it yielded 80 madeleines. I baked them in two days. No, not because it takes ages, but because I took 40 to work and the following day I baked the other 40 as a gift to a friend. As you have noticed there is no leavening agent in the batter. It will raise as a result of the cold batter being placed in a hot oven. Only take the batter from the fridge once the oven temperature is right. Keep it in the fridge in between one load and the other. For small madeleines it took only 8 minutes to have them ready.

Sunday, May 20, 2007

Asparagus salad with brown butter

I remember my first encounter with asparagus: mum used to cook this beautiful and deadly easy chicken with asparagus sauce dish. A dish that I even cooked in my university days. I remember vividly asking this good friend who was 10 years older than me how to cut a whole chicken. Mum used to go for a lot of fresh vegetables, loads of fruit, we never had fried food at home...but the asparagus wasn’t fresh. I think that in the part of Brazil we lived then it was nearly impossible to find it in those days- I am talking 1982. When I buy asparagus these days, and even mum, all beautiful and fresh, it is hard to understand how we could eat and enjoy that dish. Canned asparagus is just so soft that I call it mushy. I could not touch it with a barge pole nowadays. Funny thing life.

So on a very different note; I prepared this beautiful salad over the weekend. It is a Joanne Weir dish. So simple and so utterly delicious. The dressing is nothing without the brown butter. I tasted it before the butter was added, and I can say that the butter adds a depth to the sauce that had me asking for more. I went for some brown bread to mop up the sauce left on the dish. It is a sin to waste a single drop in my opinion.

whboneyearicon

I thought that it would be the ideal contribution for this week’s WHB. Beautiful asparagus, in a gorgeous sauce. So seasonal, simple and a great starter. The dressing can be used with other salads as well. I have sent my email to Ellie from Kitchen Wench with my contribution. Hope she likes it!


Asparagus salad with brown butter and lemons


2 eggs

3 tablespoons unsalted butter

3 tablespoons extra virgin olive oil

2 tablespoons of lemon juice

1 tablespoon white wine vinegar

1 shallot, chopped

Salt and freshly ground black pepper

1 ½ pounds fresh asparagus ends removed

Steps:

1st: boil the eggs, remove them when ready, chop them up and reserve them until they are required.

2nd: this is the trickiest part – and the maker of the recipe in my opinion, place the butter in a small saucepan over medium-high heat. Cook the butter until it begins to foam and then the foam subsides. Continue to cook until the white solids turn into a rich golden brown and the butter just begins to smoke. Remove from the heat immediately and,

3rd. throw the melted butter in a bowl, followed by the olive oil, lemon juice, white wine vinegar and the chopped shallots. Mix well.

4th. Right before serving steam the spinach. When it is ready place the asparagus on a plate, drizzle the dressing over it and sprinkle the boiled egg on top.

If you have some lovely brown bread hanging around use it to mop up the juices as they cannot be wasted.

Macadamia nut chocolate cake

This morning I felt like baking a chocolate cake. I wanted something not very fussy but quite yummy. Flicking through this book I bought recently, James Martin Desserts, I came across this recipe entitled Macadamia nut chocolate cake. There was a picture of this pretty little cake, encrusted with little pieces of chopped macadamia nuts. I decided to make it as I had all the ingredients at home. It was not even an extensive list. The only tricky item could have been the macadamia nuts, but in the end I also had that in my nuts basket.

I don’t often bake with macadamia nuts so it was a nice excuse. I love nibbling on those nuts at work, when I have a terrible hunger pang. I used the food processor for the chopping. And used the pulse button. Since I once processed peanuts for too long and they became this horrible oily mass I have decided to mind my nuts whilst getting them chopped.

The result was a lovely moist cake with a lovely discreet crunch to it. And all the deliciously sinful chocolate sauce. According to the author it is best to have it still warm. If cold it looses a bit of the texture. In case there is some to be had the following day or at a later time, just warm it up in the microwave first. If you don't feel like warming it up it is ok as well. The texture reminded me of a muffin. A nice, chocolatey one.

I have to admit that I did not notice much about the macadamia nuts. It was definitely not like hazelnuts which just fill my lungs, heart, and mind. I could only feel a gentle hint of it on the crust. Altogether it was a rather lovely cake. Not pretentious but looking very classy and as if one has spent ages on it

.

Macadamia nut chocolate cake

serves 8

75g toasted macademia nuts
190g unsalted butter, room temperature
200g sugar
4 eggs
45g unsweetened cocoa, sifted
70g plain flour
1/4 tsp baking powder

For the chocolate sauce:

25g bittersweet chocolate, chopped
1 tbsp unsalted butter
4 tbsp double cream
15g sugar


Pre-heat the oven to 180oC/350oF/Gas mark 4. Butter 8 moulds ( 5cm wide each). Place on a baking tray. Reserve.

Finely grind half the macademia nuts and coarsely chop the remainin half.

Cream the butter and sugar together and add the eggs one at a time, mixing well after each addition. Add the cocoa, flour and baking powder and stir until fully incorporated. Gently fold the ground nuts into the batter.

Fill the moulds two-thirds full with the batter and sprinkle with the chopped macadamia nuts.

Bake for 15-20 minutes or until a skewer inserted into the centre comes out clean.

To make the sauce, gently heat the chocolate and butter in a saucepan until melted, stir in the cream and sugar and continue to heat gently, stirring, until combined.

To serve, pour a pool of chocolate sauce onto each plate. Place a cake in the centre of each plate on top of the sauce. Spoon a scoop of ice cream on the side if you fancy an extra treat. The author suggested coconut.

Friday, May 18, 2007

Avocado and chickpea salad

I have already spoken about the way we eat avocado in Brazil here. In my new phase, I have become a great eater of avocado in salads. This time I went for a simple but fairly delicious specimen where creamy avocado contrasts with crunchy chickpeas. Both embrace the delicious taste of mint – cooling and warming at the same time, and you are in for a delicious dish of greenery. It is such a green salad, perfect for spring. It lifts your spirit just looking at it. Back home we say that green means hope, good vibes and this dish surely embodies it. Hope of lovelier spring days ahead, hope that there will be more gorgeous salads like this one, hope that you will all feel tempted and give it a go as well.

This was just the dish I chose for Weekend Herb Blogging, this time hosted by Rinku of Cooking in Westchester. I missed WHB last week, with me going away for the weekend and all, plus working late every single day, I did not get the time to prepare my post.So t his week I just cannot miss it as it is an event I have very much grown to like.

aaWeekendHerbBlogging


Avocado and chickpea salad


400g cooked chickpeas ( if using uncooked you will need about 250g before you cook them)

1 avocado, peeled and quartered

½ cup mint leaves

Lettuce leaves

¼ cup lime juice

1 tablespoon olive oil

½ teaspoon sugar

Sea salt and cracked black pepper


If you are a pacient person, roughly chop the chickpeas. I am not patient to this extent so I had my chickpeas as they were supposed to be eaten: whole. Combine the chickpeas with the avocado slices and mint – I love mint! Arrange the lettuce leaves on a serving plate/salad dish and place the chickpea,mint & avocado combo on top. In a separate small bowl mix the lime juice, olive oil, sal and black pepper. Give it a good
mix and pour over this beautiful salad.

Monday, May 07, 2007

Mango, Mint and Farro salad


I loved the idea of this event held my Meeta, Spring is in the air. I LOVE spring, I love spring food, spring air, spring acitivities. It is a period of great hope, where one starts over again. We had a long winter in the UK and I was counting the minutes for the change.

I love having loads of salad at this time of the year. Fresh herbs. Fruit.Berries, berries, berries. I have prepared this delicious salad which I think is very suitable for Meeta's event: a mango, mint and faro salad.The original recipe asked for bulgur wheat but I only had farro at home. If you don't know what farro is, in a nut shell it is a grain very much used in Italy.They say that the Roman legions used to feed on it. This is what About, the website says:
Grano Farro has a long and glorious history: it is the original grain from which all others derive, and fed the Mediterranean and Near Eastern populations for thousands of years; somewhat more recently it was the standard ration of the Roman Legions that expanded throughout the Western World. Ground into a paste and cooked, it was also the primary ingredient in plus, the polenta eaten for centuries by the Roman poor. Important as it was, however, it was difficult to work and produced low yields. In the centuries following the fall of the Empire, higher-yielding grains were developed and farro's cultivation dwindled: By the turn of the century in Italy there were a few hundreds of acres of fields scattered over the regions of Lazio, Umbria, the Marches and Tuscany.

The salad is great to be served with some nice chicken grilled on the barbie. A light meal. And truly scrumptious.

You'll need:

handful of mint
120g farro/bulgur wheat
a large mango cut into slices
juice of a lime
olive oil - about 2 tbs
spring onions - 4
salt adn freshly ground pepper

Prepare the faro / bulgur wheat according to the instructions on the package. Place the mango slices on a salad dish,followed by the mint leaves and the spring onions. Add the faro/bulgur wheat and mix it all.
In a separate bowl pour the olive oil, lemon juice and mix well. Then add the salt and pepper and pour it over the salad. Mix it all an serve with grilled chicken breast. It is absolutely delicious!

Inspiration: The Observer Food Monthly, UK

passion fruit cake

My good friend Patricia was the one who first told me about the event being hosted by Barbara from Winos and Foodies - 'A Taste of Yellow' in aid of the Armstrong foundation. When I heard what it was really about I decided to take part as I have lost a few people close to my heart who suffered of this terrible disease.
livestrong logo

I lost a very, very dear friend to breast cancer a few years back. We were house mates and I was with her from the beginning. She was a fighter and survived for 5 years. Andrea would have loved this cake. She loved trying new recipes. Barbara is a fighter and a surviver and this cake is also for her.I chose to bake a Brazilian version of passion fruit cake. We love passion fruit cake in Brazil and there are different versions of it. This one recipe I got from a wonderful Brazilian story teller called Sonia Novaes. The cake is lovely, slightly tangy. I like having a lovely cup of coffee with it.

Here's the recipe:

Ingredients:

2 cups sugar (360g)
2 cups plain flour (250g)

1 cup of passion fruit juice, no seeds

60g butter
1 tablespoon baking powder

5 eggs separated

Preheat the oven to 180oC – 160oC if you have a fan assisted oven. Grease and flour a bundt pan or a 31 cm x 22 cm baking tin (approximate measurement).

Beat the sugar, butter and egg yolks until the mixture is creamy and paler – about five minutes. Then intercalate the addition of flour and passion fruit juice, always mixing it with a wooden spoon. Once the two ingredients are fully incorporated add the baking powder followed by the egg whites. When you add the egg whites put 1/3 of it first, mix gently to incorporate and only then add the rest. Pour the mixture into the reserved baking tin and put it in the oven. Bake it for approximately 30 min.


When the cake is ready let it cool for 5 minutes in the tin before transferring it to a rack. Proceed to prepare the passion fruit syrup:

Pour 1 cup of passion fruit juice – seeds and all, in a pan followed by 1 cup of sugar and a few drops of lemon juice. Stir it until the sugar is dissolved. When it starts to boil remove it from the fire and drizzle the cake with it.

Wednesday, May 02, 2007

Tomato, Quinoa, Chillie, Lime and Avocado

whboneyearicon

When I first saw this salad in my Observer Food Monthly magazine I said to myself straight away: got to make it. I just so happen to be madly in love with quinoa. Not only does it looks gorgeous, little golden balls, that brighten up any salad, but they are also so good for you that one would be a fool not to have them every so often. Did you know that they are claimed to be the one of the most complete foods there are? The first time I had them was in this one delicious salad where they were coupled up with corn kernels. I only posted it in my Portuguese language blog. I will post it here as well since it will certainly be done over the summer at my house. Going back to the salad, in addition to the lovely quinoa, it also has beautifully red and ripe tomatoes, sexy wedges of avocado, and parsley plus coriander (cilantro to many of you). Visually, it won my heart. In a rational-brainy way, it won my mind and heart again. Well, stomach had to be pampered as well. So on Monday I was already preparing it as soon as got home from work. And Tuesday we had a repeat.

The picture does not make it justice. A picture taken at night is never the same. A spring/summer salad certainly deserves to be shone upon by sunlight. However, as we say back home ‘If your hunting dog is not available, take your cat hunting with you’ (make do with what you have). I took the picture with artificial light.

I have been getting avocadoes delivered with my organic box for the last three weeks now. And it is all in the name of lovely salads and spring/summer meals. I was brought up in a culture which treats avocado as a fruit which is used in sweet dishes, smoothies.. So avocado in salads and other savoury concoctions is an eating habit I developed quite recently. I remember my school days and the countless number of avocado shakes/smoothies mum used to feed us with at breakfast, before going to school. It used to be pretty filling. Deliciously creamy. The native avocado variety in Brasil (excuse the ‘s’and not the ‘z’ – I’m going native here) is different from the one I purchase in Europe. Our variety is bigger, and the flavour is not as concentrated as the one we find in the neck of the woods where I live. I also remember a very delicious and terribly simple dessert made out of avocado, condensed milk and a little bit of milk. You would pour the three ingredients in the blender and give it a whiz until you had a good creamy end result. It was a delicious creamy dish that would be kept in the top section of the fridge in order to firm up and also to get really, really cold, and work as a ‘God’s send’ in the very hot Brasilian summer days.

This salad seemed to me as the perfect late evening meal and my special post for the WHB which this week is being looked after by the lovely Kalyn. It is pretty simple to make – check it out:

100g of quinoa – ¾ cup

1 good handful of parsley

2 good handfuls of coriander (cilantro)

Cherry tomatoes – loads ( this time I used vine tomatoes chopped in four as I have quite a lot of them hanging around)

2 small ripe avocadoes, sliced in wedges

One red chilli, deseeded and cut into little, thin strips

For the beautiful dressing which I unfairly forgot to talk about above – it is the soul of the salad in my opinion:

a lime

a small clove of garlic

extra virgin olive oil – be generous without being unhealthy on the amount used

Cook the quinoa first by boiling plenty of water and adding salt to it, as soon as it reaches boiling point. Add the quinoa grains to it, reduce the heat and let it cook for around 15 minutes. Whilst the quinoa is busy getting ready, get a salad bowl (or whatever you find appropriate for your salad) and place the herbs on it, then the tomatoes and the avocado wedges. If you are using chilli as well, scatter them over the salad at this stage. Once the quinoa is ready drain it and quickly run it under a tap of cold water. Then throw it over the salad.

To prepare the dressing just put your clove of garlic (no skin please!!) in a mortar and crush it. Then add the salt and black pepper crush it a bit more. Add the lime juice and olive oil. God, it is good.

Drizzle the dressing over the salad, get some charming salad ‘mixers’(often in long spoons shape) and toss everything together nicely. Then, what are you waiting for?

Sunday, April 29, 2007

Chocolate Crepe Cake

Align Rightorangelogo
Bri, I am sorry but after loads of torn crepes, a lot of swearing and many more disasters I've hang my boots.

Congratulations to all the other Daring Bakers who have successfully wore their badges and posted the most amazing cakes. Please visit all the other daring bakers posts - their blog addresses can be found on the side bar on the right hand side.

Valentina - not so daring a baker.

Tuesday, April 24, 2007

Brazilian cheesebread

waitertheressomethingWhen I learnt about Waiter Waiter There is Something in my Bread, the event organized by Spitton Extra I thought of so many different recipes. I read various different books that I have but without being able to make up my mind. It was only with the help of my dear friend Pat that I ended up deciding to post this recipe here which is so close to my heart.

Brazilian cheese bread is such a popular recipe in Brazil. It spans all the five regions in which the country is divided and no matter your background or where you come from you are very likely to be fond of it. Obviously there will be some who don’t.

There are many different recipes and I personally baked using a different one for a very long time until last year when I came across this recipe with potato in the dough. It fascinated me.

The main flour for cheese bread is tapioca flour (or potato starch in some countries). There are two types of tapioca flour in Brazil: a) the sweet or fresh starch, and b) the sour starch. The latter has a more acid taste than the former. It has all to do with the fermentation process of the cassava juice. In some parts of Brazil you only find one of the types. Luckily in London I find both of them and sometimes I have halfof the tapioca flour amount of the sweet one and the other half with the sour flour. I personaly believe that the sour flour gives a nice crust. Where the sweet one is odourless, the sour one is rather 'acid'( slightly smelly).

Melissa from The Traveller’s lunch box wrote a very good article about our national treasure – as a Brazilian I was marvelled by her accuracy of the facts.

The recipe below can be kept in the fridge for up to 2 days but it cannot be frozen. I tend to keep it in a sealed container. And bake medium portions at a time. The time in the oven tends to be around 15 minutes at least. The cheese bread will be nice and round(ish). If they are not left in the oven for the correct amount of time they will deflate as you remove them.

You can read more about it in an article I published at my Tapiocaflour blog. Please note that the cup measures in that article are for a 200ml equivalent cup – it applies to milk and vegetable oil amount.

Brazilian cheesebread - another variation

Approximately 30 units

140g tapioca flour ( tapioca starch)

300g cooked and mashed potato

100g grated parmesan cheese ( I tend to add a wee bit more)

1 tablespoon butter ( approx 15g)

1 egg

Put the tapioca flour and the mashed potato in a bowl and mix with your hands. Then add the milk and do the same. The next step will be to add the oil. The cheese is added after the oil is well incorporated into the mixture. Finally, bet the eggs lightly and then add them to the bowl. Here I prefer to mix everything with a woden spoon first, and then use my hands towards the end to ensure that the mixture is even. The mixture will be ready when it no longer stick to your fingers.

Make small balls and put then on a baking tray – no need to grease the tray. You can also freeze some of the recipe and bake the cheesebread from frozen.

Preheat the oven to medium temperature – 180oC , for about 15min and bake the cheesebread rolls until they become golden.

Sunday, April 22, 2007

llittle daisy cakes

shf_logo

Since the first time I saw these cakes in one of the Waitrose publications I fell in love with them. They had this wonderful spring feel. Appealing to the eye, and hopefully to the taste too.

I had never worked with marzipan before – believe me, that was true then, but I decided to give it a go. I even got the nasty glace cherries. I completely loathe them. I always wonder how something as wonderful and delicious as cherries can be turned into this ghastly tasting thing. However, I decided to pretend not to care about them and get my cakes done. After all they had a role to play. The whole cake doesn’t take very long to prepare. They look so cute when ready to go into the oven that I couldn’t wait to see the final result. Once ready I couldn’t wait to prepare my cup of tea and enjoy the first bite. They are lovely cakes. The sort of thing you want in the middle of the afternoon, when a nice cup of tea is asking for company.

Sugar High Friday held by Monisha, seemed a perfect occasion to post them over here. A perfect celebration of what is to me one of the most wonderful seasons – spring. After all the dark, cold wet days of winter there comes this fabulous time of the year when colours are everywhere, we feel rejuvenated, ready to do loads of things. What most wonderful than little daisies?


Little Daisy cakes

200g butter, softened – plus a bit extra to grease the tins

200g white marzipan at room temperature

75g caster sugar

275g self-raising flour

5 eggs, beaten

2 tbsp milk

1 tsp almond extract

200g glace cherries

200g sultanas

25g flaked almonds

Preheat the oven – 150oC, gas mark 2. Generously grease 20 holes of muffin tins.

Cut the butter and marzipan into cubes and place in a large mixing bowl with the caster sugar. Beat with an electric whisk until pale, fluffy and completely combined. Sieve the flour into the marzipan mixture, add the eggs and beat together. Stir in the milk and almond extract. The cake mixture should have a soft dropping consistency.

Wash the syrup from the cherries, pat dry with kitchen roll, and then cut in half. Reserve 20 of the halves and stir the remaining cherries together with the sultanas, into the cake mixture. Spoon the mixture evenly into the 20 holes in the muffin tins. Arrange the flaked almonds on top of each cake and place one of the reserved cherry halves in the centre to make a flower pattern. Bake in the preheated oven for 20-25 minutes, or until the cakes are light golden, and a skewer comes out clean when inserted into the centre.