Sunday, February 25, 2007

Ginger-scented chocolate mousse with mango and passion fruit


Ever since I first read this one article about Philippa Sibley, the famous Australian desert chef, I wanted to make all the recipes in it. Her main element is fruit in desserts and I am such a fan of fruit in sweet things. Plus she is so innovative. It is exciting to read her recipes and I believe that if you are passionate about cooking there is no way you won’t feel like heading to the kitchen. I had to have a great amount of self-control. I gave in to temptation straight after purchasing the magazine and prepared her cherry and pistachio clafoutis. What a great dish. Delicious to the taste and visually equally stunning with the pistachio-green-tone. The next one on my mental list was the ginger-scented chocolate mousse with mango and passion fruit. The sheer unusual combination of ingredients has to be seen first hand. There was an event on the web which I wanted to join and this was going to be my dish. Unfortunately I missed the deadline but here I come with the dessert anyway. If you ever get your hands on a magazine with an article about Philippa, do read it. I am sure you will also be captivated by her talents.

I just want to say that I was a bit too greedy and prepared really big portions of the dessert (look at the size of the glass!). I am convinced that it has to be served in smaller portions. Less is more!! I have learnt my lesson.

Serves 6

1 egg

2 egg yolks

100g caster sugar

175g chocolate – 64%, melted and kept warm

60g glacé ginger, finely chopped, syrup reserved

1 ½ cups thickened cream, whisked to soft peaks

Pulp of 6 passion fruit

1 large mango (about 460g) cut into 2 cm cubes

Chocolate curls to serve

Combine egg and egg yolks in an electric mixer and whisk at high speed for 5 minutes or until pale and fluffy. Combine sugar and 1/3 cup water in a small saucepan and stir over medium heat to dissolve sugar, then bring to the boil and cook until syrup reaches hard ball (121oC on a sugar thermometer). Reduce mixer to low speed and add syrup to egg mixture in a thin steady stream, then increase to high speed and whisk for 5-7 minutes or until completely cold. Fold in chocolate, and then fold in glacé ginger and cream.

Combine passion fruit pulp and 2 tsp syrup from glacé ginger in a small bowl. Divide the mango among serving glasses, spoon over passion fruit syrup, then spoon chocolate mousse over fruit and refrigerate for 1 hour or until set. To serve, scatter with chocolate curls and serve immediately.

According to Philipa’s notes in order to get the curls you can drag a round pastry cutter across chocolate to form the curls. If you don’t success – as me, top with coarsely grated or shaved chocolate.

Sunday, February 18, 2007

seafood risotto

This is a really lovely risotto. I absolutely adore seafood The end result is a very creamy dish with lovely flavours coming through at every mouthful. I did not make my own stock. Instead I used bouillon which is a vegetable stock with no artificial additives, no gluten. So instead of all the stock preparation step below I boiled my stock and added the fish. After approximately10 min I removed the fish and flaked it. I also did not have to put the stock through a colander for obvious reasons. The rest was as described below. I have omitted the addition of a glug of olive oil at the end as I felt it to be unnecessary as well as the extra spoonful of stock once the risotto had been divided between the plates. My risotto was already creamy enough.
The recipe was taken from Jamie Oliver's JAMIE'S ITALY. A book that is full of wonderful recipes and to whom watched his show on TV where the whole trip was filmed it will bring all these memories from scenes shown.

1.5 litres water (3 pints)

2 small carrots roughly chopped

3 tomatoes squashed

1 bay leaf

A small bunch of fresh parsley, one sprig left whole, remaining leaves picked and finely chopped

1.5 kg mixed seafood, scaled, cleaned, gutted, if using mussels they should be debearded

400g risotto rice

2 tablespoons of olive oil

A knob of butter

½ bulb of fennel, finely chopped, herby top removed and reserved

1 teaspoon fennel seeds

A pinch of crumbled dried chilli

A pinch of saffron strands

Juice of 1 lemon

50g butter

If you are going to prepare the stock from scratch put all the water into a large pan with the carrots. Tomatoes, bay leaf and whole sprig of parsley. Bring it all to boil, adding the whole fish to it and leaving the shellfish out. I used a beautiful peace of salmon I had. Simmer for 10 minutes, then remove each fish from the pan and flake the flesh away from the bones. Put the meat on a plate and reserve. Return the bones to the stock to simmer for another 15 minutes. This will add great flavour to your stock. Skim any froth from the surface. Pass the stock through a colander into another pan and throw away the vegetables bits as well as the fish bones. Return the pan with stock to a low fire

Start the risotto by putting olive oil and knob of butter on a pan. Once it is melted add the chopped fennel, fennel seeds, dried chilli and saffron strands and cook very slowly stirring until the fennel bits have softened. Add the rice and put the heat up. Keep stirring all the time until the rice is translucent. Then start adding ladles of the stock to the rice, always stirring. Once the amount added is nearly all absorbed add another ladle full. When the rice is nearly cooked add the shellfish and flaked fish. Stir for a good 3-4 minutes until all the shellfish is cooked (the mussels will have opened up). Remove from the heat and add the butter, check the seasoning and add the lime juice. Divide the risotto between the plates and sprinkle with the remaining parsley and reserved fennel tops.

Saturday, February 17, 2007

Scottish Pancakes

I’ve always really enjoyed Scottish pancakes. Firstly because they are small. Secondly because of how great they taste. They are not blow-your-mind delicious, but have a gentle ‘deliciousness’ about them that does it for me. I used to buy small packages at Marks & Spencers and eat them up as if there was no tomorrow. Seriously. I find it quite charming that they are treated like toast and we eat them with butter and/or jam. I love toasting them. They are also great with scrambled eggs.

In preparation to pancake day I decided to prepare some Scottish pancakes. And had them with a tad of butter. The next day I still had some so I only had them toasted with butter again. I had no jam in the house so butter was the only option.

This time round I have used Nigella Lawson’s recipe from the beautiful book ‘Feast’. This is definitely the best Scottish pancake recipe I have ever prepared. Approved even by a scott.

Here it goes:

½ teaspoon white wine vinegar

150ml milk – room temperature

110g plain flour

½ teaspoon bicarbonate of soda

1 egg

1 tablespoon vegetable oil

1 tablespoon golden syrup

Put the vinegar into the milk and set aside. Put the flour into a bowl and add the bicarbonate of soda. In another jug or bowl add the egg, oil and then with the oily spoon measure the syrup in and whisk everything together. Add the vinegary milk, and then add the jug of wet ingredients to the dry, whisking to a batter.

Heat a flat griddle or heavy non-stick pan with no oil. Add 1 ½ tablespoons of batter to make each pancake, and then when bubbles appear flip them over to make them golden brown on either side.

Sunday, February 04, 2007

lavender rice pudding

I saw this dish for the first time in the beautiful blog ‘Café Fernando’. What attracted me to it first was the lavender ingredient. I have always loved the smell of lavender and last year I baked with lavender for the first time. The way all the senses are touched by this ingredient fascinates me. Plus I also had some lavender in the cupboard so I decided to use it.

The experience was fantastic. If anything it was relaxing. I had it cold as per Cenk’s post. Even though I am not a big fan of rice pudding I did enjoy it. I just thought that Cenk’s was creamier than mine. I did forget to cover it with cling film when in the fridge so I wonder if the pudding lost a bit of its moisture like that.

Cenk, thank you for this experience!

Below I put the ingredients and how to prepare exactly as per Cenk’s post – but do visit his blog if you haven’t yet done it as it is a beautiful space. This is the way to Café Fernando.

Lavender Rice Pudding

Ingredients

1/2 cup Arborio rice

2 1/2 cups whole milk

1 cup boiling water

2 tablespoons lavender

2/3 cup sugar

2 1/2 tablespoons cornstarch

Method

Put milk, sugar and lavender in a small pot, bring to boiling point, take off heat and let steep for 30 minutes minimum. Put the rice together with boiling water in a small pot and cook on medium heat with lid half closed for 15 minutes, until all the water is absorbed by the rice.

In a small bowl, mix cornstarch together with a couple teaspoons of water and add a bit of hot milk to increase its temperature. Then add the whole thing into the milk. Transfer the infused milk through a strainer into the rice and cook for 30 minutes or so, until you reach the desired consistency. Transfer the pudding into your serving dish and refrigerate (covered with plastic wrap) until serving.

Saturday, February 03, 2007

Leek and lime risotto with lime prawns and parsley

I tend to leave the office at the end of the day feeling really famished. It is not only a hunger pang. I find that when we feel like that the danger is that we go for the first edible thing that crosses our path. I struggle really hard not to eat the first pack of crisps that I see on the way home. Often a bottle of fizzy water keeps my stomach at bay. The other day I got home and the quickest thing that I could knock out was a risotto. I know that risottos require a lot of attention but the good thing is that it keeps me off nibbling and by the time my risotto is ready I enjoy every bit of it.

There is something wonderful about rice. It is so comforting; versatile.It looks beautiful in its whiteness. Risotto is one of those dishes that play with our creativity. This time I used leeks and lemons. I also had some prawns in the fridge so I prepared them on the side and served with the risotto as well. The result was a lovely, creamy dish with a lemony taste.

This dish feeds two not-so hungry eaters.

For the risotto:

700ml chicken/vegetable stock (I tend to use vegetable)

1 tablespoon olive oil

1-2 leeks, finely sliced

1 cup Arborio rice or any other risotto rice

Parmesan shavings

1 tablespoon lemon juice

Freshly ground black pepper

For the prawns:

A knob of butter

Prawns for two people

1 teaspoon lemon rind

1 tablespoon chopped parsley

1 tablespoon lemon juice

Sal

I like to prepare the prawns first: Melt the butter in medium heat and when it has melted add the lemon rind and chopped parsley. Give it a good stir before adding the prawns to the pan. Season. When the prawns turn pink all over it is time to take them off the heat. They can so easily become rubbery and unpleasant to the palate.

To prepare the risotto: place the stock in a saucepan in medium heat and take it to a very slow simmer. Then place the olive oil in a separate pan, throw the leeks in and cook until soft. Slowly add the rice to the pan and cook, stirring, for 1 minute or until it is translucent. Only then start gradually adding the stock. After every addition stir constantly until liquid has been absorbed. Continue adding stock until rice is soft and the risotto is creamy. If you need more liquid heat extra stock. The rice grains should be firm but tender. Serve immediately and put the parmesan shavings and prawns on top of the risotto.

It will put a smile on your face.

Sunday, January 28, 2007

Banana and passion fruit soufflè

Banana and passion fruit always remind me of home, Brazil. Not that we are the only country that has those fruits are native specimen. It is just that we have such wonderful variety of bananas, and our passion fruits are really big and juicy. I grew up on passion fruit juice to calm the nerves.

Back to the soufflé. It is a Gordon Ramsey recipe, from his book Sunday Lunch. I also watched Ramsey prepare it on a cd-rom that came with the book and in it he uses very soft butter to brush the ramekins – as opposed to melted butter as described in the recipe. I used very soft butter as well. This soufflé is absolutely delicious and banana and passion fruit work so well together that I felt like making more experiment with them. You will have to return in order to see my experiments. For now I will leave you with the soufflé. Enjoy!!


Crème
pâtissière base

150ml milk

100ml double cream

15g plain flour

10g corn flour

3 large egg yolks

50g caster sugar

The soufflé


4 ripe passion fruit (the skin is slightly wrinkled)

1 ripe banana peeled (approx 100g)

Squeeze of lemon juice

2 tbsp banana liqueur (optional – in my opinion it makes no difference)

About 20g softened butter, to brush

50g caster sugar, plus extra in case you want to dust with it

Grated chocolate, in case you want to dust with it (I recommend)

2 large egg whites

Icing sugar, to dust soufflés at the end

For the crème pâtissière base:


Heat the milk and cream in a heavy-based saucepan until almost boiling. Sift the flour and corn flour together. Reserve. Beat the egg yolks and sugar together in a large bowl, and then mix in the flour well, so that no lumps form. Add a splash (not a drop more) of the hot creamy milk and whisk well (I like using a
fouet) until the mixture is smooth. Then gradually whisk in the rest of the milk. Pour back into the pan and whisk over a medium-low heat for 3-5 minutes until thickened and smooth. You will be able to see the bottom of the pan. Transfer to a bowl, cover and cool at room temperature, stirring occasionally to prevent a skin forming.

To prepare the filling:

Halve the passion fruit and scoop out the seeds and juice into a sieve set over a bowl. Press to extract the juice, and then pour into a blender. Break the banana into pieces and add to the blender with the lemon juice and liqueur (if using it). Give it a good whiz until smooth, then stir the mixture into the crème ptissière and set aside.

Heat the oven to 190oC.Brush 6-8 deep ramekins with a generous layer of melted butter, using upward strokes that imitate tram lines. That will help the soufflé rise once the heat is in action. Dust the inside with caster sugar or grated chocolate – I think that the chocolate is by far the nicest way, and pale the ramekins in the fridge to chill and set.

When ready to serve, whisk the egg whites in a clean bowl to firm peaks, then gradually whisk in the 50g caster sugar a spoonful at a time to make a film, glossy meringue. Whisk a third of the meringue into the crème pâtissière base and mix to combine everything into a smooth paste. Just then carefully start folding the rest in, using a large metal spoon, being careful not to break the bubbles of air created.

Divide the soufflé mix among the prepared dishes – only ½ first. Tap them on the work surface to level the mixture. Then proceed to filling them to the top and level with a palette knife and run your fingerprint around the edge of the ramekin. It will create a slight depression between the edge of the ramekin and the top of the soufflé. It will help the soufflé rise evenly. Sit the ramekins on a wide baking tray and bake for 12 minutes until well risen and lightly golden on top. DO NOT BE TEMPTED TO OPEN THE OVEN DOOR UNTIL THE TIME IS OVER. They will be a bit wobbly in the middle when ready. Dust with the icing sugar and serve at once.

Tuesday, December 26, 2006

Silvia´s mother-in-law's bread recipe

The original recipe for this bread was taken from a Brazilian blog called Doce Casinha – click here if you wish to visit it. A couple of things made me pick this recipe: the first one was the lovely description given by Silvia, the author of the blog; the second was the fact that I had bought some fresh yeast at the supermarket and was looking for a recipe. I have to add that I love when I am home in Brazil and I can easily buy fresh yest at any supermarket. In the UK we always need to go to a local supermarket that is big enough to have its own bakery so that you can ask for some. I do not like using dried yeast.

Back to Silvia´s recipe, she got it from her mother-in-law, and in the post she comments on how she ended up veering out of her diet because of it. The bread is meant to be irresistible.

I loved the dough – it has to be said. It came together very quickly. I do have to admit to not having used the same method as Silvia to prepare the dough. I use a method learnt in a bread making course given by Richard Bertinnet. In it all the dry ingredients are put in one bowl – each one in its little corner. The salt (and sugar when used) are covered with a bit of flour so that they do not get in contact with the fresh yeast before it is the right time. The fresh yeast is crumbled in its little corner, away from salt (and sugar) and complety mixed with the flour using the hands. Once it is all incorporated you proceed to giving the dry ingredients a mix before adding the ‘wet’ ingredients to the mixture. Using a spatula you proceed to mixing all the ingredients in circular movements until dry and wet are all integrated. From there onwards the process is the same: turn the mixture on to a lightly floured surface and then you know the rest. Richard’s method has never failed me. However, I will say that you should stick to a method that you are familiar with.

As for the filling I just wanted to add that despite the ingredients listed you can use your own variation. You will be surprised with how light this dough is. Already a favorite.


INGREDIENTS

Dough
:

- 50 g fresh yeast

- 2 cups of water
- 1 kg bread flour
- 1 tablespoon sugar

- ½ teaspoon salt

- 3 eggs
- 1 cup vegetable oil


Filling:

aproximately 300g ham e

aproximately 300g de cheddar

finely chopped onions

finely chopped tomatoes – no seeds

chopped parsley - or coriander if you prefer

a bit of salted butter

Preparing the dough:

1. Dissolve the yeast in 2 cups tepid water.

2. Put the flour, sugar and salt in a bowl and mix the ingredients.

3. Add the dissolved yeast, oil and eggs and mix all the ingredients until you get an even mixture.

4. Transfer it to a lightly floured surface and knead it for about 4 minutes. The mixture will come together very quickly. This is na excellent dough.

6. Put it in a bowl, cover and leave it to rest in a warm corner of your kitchen, away from drafts.

Now get busy sorting out the ingredients for the filling:

1. Chop the ham and the cheese and put it in a bowl

2. Add the onions, tomatoes and chopped parsley

3. Season it very lightly if you wish. Reserve.

Have a cup of tea, sort out the baking tray. If you are going to use muffin tins get them out of the cupboard and give them a nice wipe. No fluf in your bread!

When the dough has doubled in size get it back a floured working surface and knead it gently one more time. You can divide the dough in 2 as it is big enough.

You can shape your dough in many different ways. The original recipe maker opens it up like an A4 sheet. Some butter is spread evenly on it and the filling follows. Try to keep the filling in the center leaving a bit of room on the sides. Roll it up as if you preparing a swiss roll. Do exactly the same to the other half of dough if you have split it into two parts. Put both rolls on trays, cover them and return them to the cosy kitchen corner previously used. They will increase in size again – about ¾ of their original size.

Final stage:

When your dough has already been resting for 30 minutes of its last stage, turn the oven on – 200°C. The oven will be ready at approximately the same time as your dough. Just before you take it to the oven brush it with an egg wash mixture and sprinke it with dried oregano if you like the taste of it. You will love the smell that will take over your kitchen. Take the tray in and bake it for about 15 minutes. It should be golden when ready.

Leave it to cool before taking a bite. If you burn your tongue first you will not be able to fully appreciate the delicious flavour of this bread.

Monday, November 20, 2006

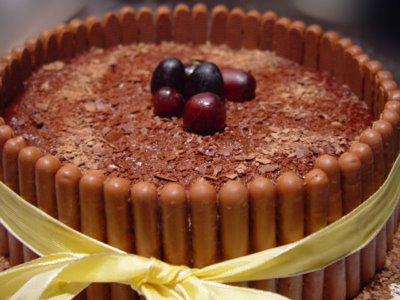
a delicious white cake with chocolate ganache

It has been quite a while since I posted a recipe here. Maintaining 3 blogs and the occasional post on a 4th one can be quite a challenge and my work load just did not help. I carried on cooking but physically only managed to post on the Portuguese version of Trembom. I do have to say that it is wonderful to be back here. Hopefully this time I will have no more interruptions – not very long ones any way.

To celebrate my return I have decided to share a cake that I baked for a lovely friend, Deb. She is now married to my very good friend Rob, whom I have worked with for a good few years now. She is as wonderful as he is. What a lovely couple. I couldn’t go to Deb’s surprise birthday party so when I was invited to have dinner with them I decided that the occasion asked for a lovely cake. I did try loads of different recipes – all equally nice. Some I had already baked before, others I wanted to have a go at. I am not the most decisive person. Up to the last minute I am thinking about another ‘possibility’. When I go out for a meal for instance, I keep changing my mind about my choice until the minute the waiter takes my order. Often it ends up being none of the ones I had already talked about.

So keeping up with tradition, on the very last minute I decided that the cake that I was going to bake was going to be a white cake. Even though I did know that Deb really likes chocolate I decided to go for a white cake with chocolate ganache as filling and icing. It would be not as sickening as a whole chocolate cake with chocolate trimmings as well.

The idea for the cake came from the blog Technicolor Kitchen. Patricia, who owns the blog, got the original recipe from Baking Sheet. See the original recipe here. As Patricia rightly said the cake is absolutely delicious. It is quite firm but also wonderfully light – no egg yolks, only egg whites. Plus it smells absolutely divine. The almond and vanilla essence combined transport you to a wonderful place – it tickles all your senses in my opinion. For the ganache I got a recipe from Pierre Herme ‘Chocolate Desserts’. It is great because it is not too sweet but it is chocolaty enough for the chocoholics to enjoy. If you wish a copy of the recipe just let me know and I will mail it to you.

I did still want to decorate the cake and I went for chocolate fingers, fencing it off, and chocolate flakes on top. I do have to say that I was quite proud of my achievement. I am not the most gifted person when it comes to cake decoration but perhaps there is hope for me.

Monday, July 24, 2006

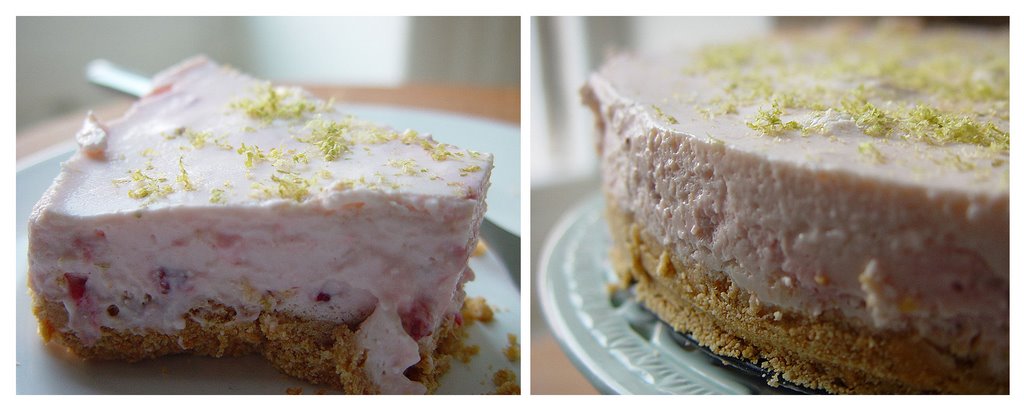
Strawberry and Lime Cheesecake

I bought Sophie Grigson’s Country Kitchen a while ago. After seeing her on TV a few times – actually quite a lot, I decided to buy the book. For no special reason I only got to use it this weekend just gone. I fell in love with this strawberry cheesecake recipe and made sure that I got all the ingredients to try it over the weekend. I did consider using yogurt in order to make it a tad lighter but I had to drain it for a good eight hours and I didn’t organize myself enough. So in the end I decided to use the recipe as it is, and not to feel guilty about the extra calories. Instead I would enjoy every mouthful if it was worth it. It is one of those cheesecakes that don’t get cooked. You just need to let it set in the fridge. Lovely in a very hot day as nobody can stand the extra heat of the oven.

I loved the fact that we combine strawberry and lime as the two fruits seem to complement each other very well. I used a little bit more biscuit as I really love a crunchy base. In my opinion this cheesecake works well because it does not get too sweet – I did worry about it a bit. You can prepare a sauce to go with it but in my excitement to eat the cheesecake I confess to have forgotten all about it. Indulge.

For the base:

220g digestive biscuit/ tea biscuit

110g unsalted butter, melted

For the filling:

3 leaves gelatine

150 ml single (pouring) cream

300 g cream cheese

125 g caster sugar

Finely grated zest and juice of 2 limes

300 g ripe strawberries, hulled and chopped

150 ml double cream, whipped

Crush the biscuits finely, either using a food processor or putting the biscuits in a bag and crushing them with a rolling pin. How thin you crush them depends on how you like them. Pour the butter over the crumbs and mix it all until the biscuit crumbs are covered. I prefer to do that using my hands as opposed to a spoon.

Put some water in a baking tin, enough to cover the gelatine, and throw the gelatine in. Leave to soak for 5 minutes. In the mean time bring the single cream to the boil and the remove it from the heat. Squeeze each gelatine leaf to remove the excess water and throw it in the pan with the cream, stirring one by one. They will dissolve instantly. Leave to cool for a few minutes.

Put the cream cheese in a bowl with the sugar, half the lime zest and all the lime juice. Beat together until smooth and creamy. Mix in the single cream mixture and then the chopped strawberries. Next fold in the whipped cream. Now pour the whole lot into the tart tin and smooth down lightly. . Chill until set, then sprinkle with the remaining lime zest.

Sunday, July 23, 2006

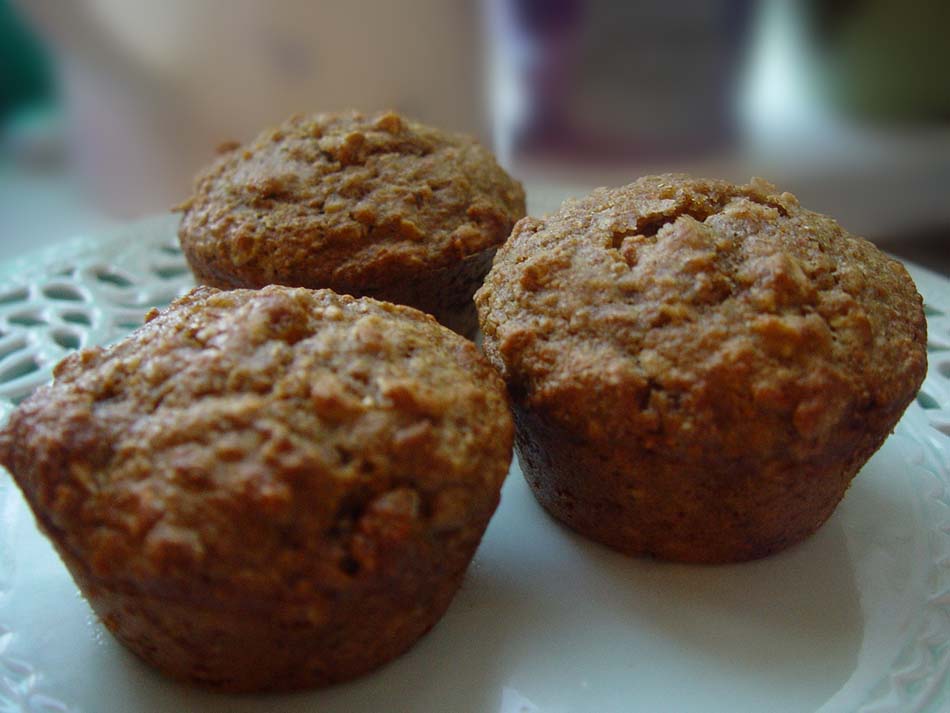
Whole wheat, Oatmeal and Raisin Muffins

This is a delicious and very healthy breakfast muffin. There is so much goodness in one of these – loads of fibers, dried fruits, vitamin E, antioxidants. It is very filling as well. One of these plus my morning fruit and coffee keep me going for the morning.

Another great thing about it is that you can play with some of the ingredients. This time for instance I haven’t used dried cranberries as I had none. Instead I used dried figs. Did the same with the dates – used prunes instead. You can prepare the dried mixture the night before, in the morning put the oven on and whilst it heats up mix the wet ingredients with the dry ones. Leave the mixture for about 15 min – it allows the oats, wheat germ and bran flakes to soak up the liquid. I have made it without the resting time in the past and I did notice that the muffins weren’t as tender as they get when they rest.

If you use UK measuring cups it will be 240ml full cup, I used Australian size cups – 250 ml – greedy, I know.

1 cup whole wheat flour

¼ cup granulated sugar

¼ cup packed brown sugar

2 tablespoons untoasted wheat germ

2 tablespoons wheat bran

1 ½ teaspoons baking soda

1 teaspoon ground cinnamon

½ teaspoon salt

1 ½ cups quick cooking oats

1/3 cup chopped pitted dates

1/3 cup raisins

1/3 cup dried cranberries

1 cup buttermilk

¼ cup groundnut oil

1 teaspoon vanilla extract

1 large egg, lightly beaten

½ cup boiling water

Combine the flour and next 7 ingredients (through salt) in a large a bowl. Next step is to stir in the oats, dates, raisins and cranberries.

In a separate bowl mix the buttermilk, oil, vanilla extract and egg. Make a well in the center of the dry mixture and add the wet ingredients to it. The boiling water is the last ingredient to be added. Let the batter stand for 15 minutes.

Preheat the oven to 190˚C/ 375˚/ gas mark 5. Spoon the batter into cooking oil coated muffin trays. Bake for 20 minutes or until muffins spring back when touched. Remove the tin from the oven and get the muffins out of the tin immediately, moving them to a wire rack to cool.

Passion Fruit Ice Cream

I absolutely love passion fruit. In the summer I find that there is nothing more refreshing than passion fruit blended with water, loads of ice, a squeeze of lemon and a bit of sugar. Passion fruit ice cream is a luxurious refreshing treat.

I spent the whole week dreaming with this recipe. Couldn’t wait till my tiny freezer was empty enough to fit the ice cream maker. I finally managed to make room for it yesterday. I don’t consume ice cream only in the summer but it is much more welcome on a hot day. And it has been hot around here.

This ice cream is lovely, with a zesty touch to it. I used lime instead of lemon - no special reason other than the fact that I much prefer lime to lemon. Habit probably. And even though they cost 15p each I still buy more of them than the ordinary lemon.

The recipe can be found in Falling Cloudberries – A World of Family Recipes but I will also share it with you here. This book is full of wonderful recipes.

250 ml pouring cream (single cream)

250 ml milk

230g caster sugar (superfine)

Grated rind of 1 lemon

Juice of 2 small lemons

Pulp of 6 fresh passion fruit

Put the cream, milk and sugar in a bowl and stir until dissolved. Put the rest of the ingredients in and transfer it to the ice cream maker if you have one, following the manufacturer’s instructions.

If you don’t have an ice cream maker don’t despair. After dissolving the sugar in the mixture of cream and milk cover the bowl and put it in the freezer. After an hour, remove the bowl from the freezer and give an energetic whisk with a hand or electric whisk, then return the bowl to the freezer. Whisk again after a couple of hours, this time adding the lemon juice and rind and passion fruit pulp. Return it to the freezer. When it is nearly firm, give one last whisk, transfer it to a suitable freezing container with a lid and let it set in the freezer until it is firm.

Tuesday, July 11, 2006

Corn Cake


I cannot remember how long it had been since I had last eaten sweetcorn cake. Just taking a bite brought all these wonderful memories back. Memories of the month of June and all the fabulous celebrations that we have all over Brazil. All the lovely cakes - farm style cakes. Cakes with no fuss. Just delicious. Sweetcorn cake says ‘cup of coffee’, farmhouse kitchen, sitting at the table in the afternoon and spinning a really good yarn.
The ingredients are so Brazilian – not in their origin necessarily, but in their usage. Yellow cornmeal is a favourite with Brazilians when it comes to good, honest, Brazilian cakes. They can be baked together with bits of guava paste, with coconut milk, fennel seeds... Coconut milk is an ingredient that in Brazil is used mostly in cakes and desserts. We have one or a couple of typical savoury dishes which take coconut milk. Apart from those, it is always associated with sweet goods. Then we also have condensed milk. You would not believe how popular condensed milk is amongst Brazilians. It is used in cakes, in cocktails, in desserts. We call it popularly ‘the milk lady’. The reason being that when Nestlé started selling their goods in Brazil back in 1890, the condensed milk can had the picture of a milk lady,’ Condensed Milk – Milkmaid Brand’. The ladies of those days who were the ones to do the shopping, asked for the tin with the milk lady on it – Leite Moça. If my memory doesn’t betray me the tins in Brazil still have the lady on it.
Going back to the recipe, I got it from Clarice, my friend who runs the blog Pecado da Gula. I will eventually publish it on m blog about Brazilian food and will endeavour to tell a bit more about it – if you fancy a visit.
Click here to see the recipe.

Saturday, July 08, 2006

Courgette Flowers

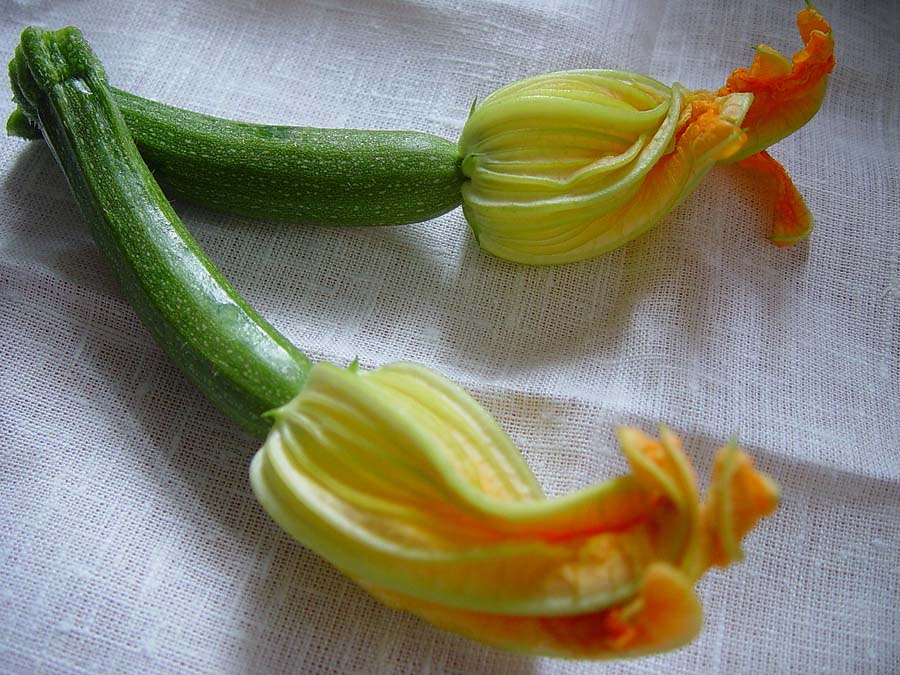
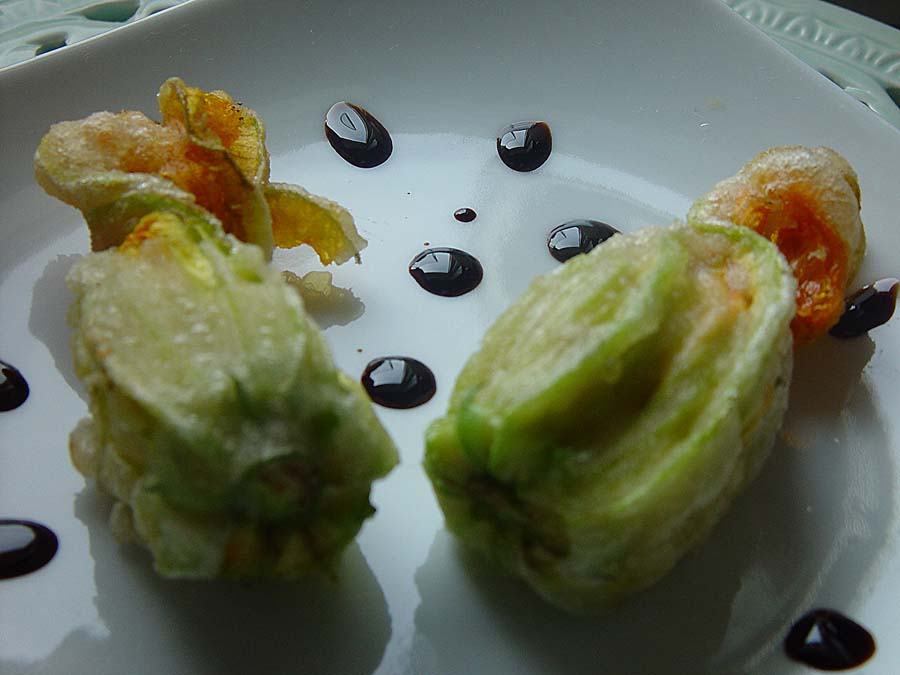
Courgette flowers are not easy to find so even though I paid a small fortune for them I decided that it would be worth every penny - or so I hoped.These are from Holland. I bought them from a store at Borough Market in London. They are just so delicate and beautiful!!

Of all the recipes I came across I decided to use one by Australian chef Curtis Stone.

Ingredients

150ml balsamic vinegar
12 courgette flowers, attached to courgettes
groundnut oil, for deep frying

For the stuffing:
250g ricotta cheese
2 basil leaves, shredded
squeeze of lemon juice
50g freshly grated Parmesan cheese
salt and fresh ground black pepper

For the batter:
100g plain flour, plus extra for dusting
120ml fizzy mineral water

Preparation:

1. Pour the balsamic vinegar into a small saucepan and boil for a few minutes until reduced to a syrupy consistency. Set aside.

Mix together the ricotta, shredded basil leaves, lemon juice and Parmesan. Season with salt and pepper.

Trim the courgette flowers from the courgettes and shake free of any insects. Slice the courgettes in half lengthways and set aside. Carefully open the flowers and filll them with the ricotta mix. Be gentle as they are very delicate. I ended up using my fingers as even the smalles spoon i had - a tiny coffee spoon from home, proved not to be the best tool.Perhaps experience makes it better. Twist the end of the flower to keep the stuffing in place. To make the batter pour the water into a shallow dish and gradually whisk the flour through a sieve, making sure there are no lumps. The batter should have the consistency of thick pouring cream.

Pour enough oil into a high-sided frying pan to come to a level of about 3cm. Heat until very hot but not smoking. Roll the stuffed flowers and courgette halves in flour. Working in small batches, quickly dip them in the batter, swirling to coat, and then into the pan. Deep-fry for 1-2 minutes until the batter is crisp and golden. Put them on a dish lined with kitchen towel to drain the excess fat - if any. Place in a warm serving dish, sprinkle with grated Parmesan and drizzle with the balsamic vinegar.

I also used some of them to prepare some halibut I had in the fridge.It is a very simple and quick dish. If you cannot find the flowers it is ok to use very finely cut courgette strips.

halibut or sea bass

courgette flowers

olive oil to drizzle

sal and freshly ground black pepper


Heat the oven - 200oC. Line a baking dish with greaseproof paper and set aside.

Cut the fish in small pieces, put salt and pepper, and roll each one of them with strips of courgette flowers. You might need to use a tooth pick to keep the strips well attached to the fish. Put the pieces on a baking tray and drizzle with olive oil. Roast for aproximately 5 minutes. Let them reset for a couple of minutes before serving.

Click here if you wish to read the post in Portuguese.

Chickpea and Pomegranate dip with pitta crisps

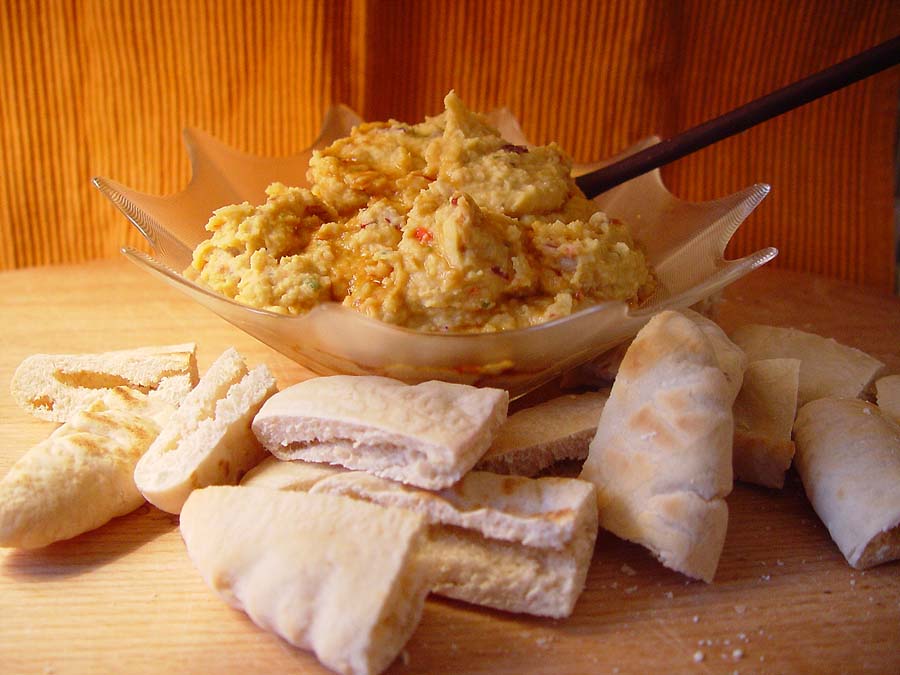
Chickpeas, grão de bico, garbanzo. God bless the greeks, romans and egipcians who use to cultivate it a long time ago. And double blessed are the Portuguese and Spanish for spreading it around the world back in the old days. Chickpeas are so full of goodness – well beyond their wonderful flavour. They lower cholesterol, are rich in fibers, have a high level of protein and are low in calorie. The Spanish use them quite a lot in their diet. Good on them. I am a very big fan, and confess to sometimes overdoing it on the ‘nibbling ‘ front. For this dip you can leave the chillies out if you are not into spicy food. It goes really well accompanied by a good yarn with friends and a glass of your favourite wine.


6-8 Pitta bread

100ml extra-virgin olive oil plus extra for the crisp

1kg 200g Chickpeas

1 Lemon, juiced

2 red chillies, seeded and chopped** optional

1 clove garlic, crushed

2 tsp cumin seeds, toasted in a dry frying pan

1 small red onion, finely chopped

A small bunch mint or parsley, finely chopped

Pomegranate molasses thinned down with a bit of water

Heat the oven – 200oC/fan 180oC/gas 6. Cut the pitta into triangles and spread them on a baking sheet. Brush them with olive oil and bake for 7-8 minutes – until golden and crisp.

Put the chickpeas, 100ml olive oil, lemon juice, chilli and garlic in a food processor, season an pulse until crushed. Add the mint/parsley, red onion and cumin seed and pulse it some more. Adjust the seasoning. Drizzle with pomegranate syrup and serve with warm pitta crisps.


I also like having it with a leafy salad. I sometimes thin it down with a bit of olive oil.


Click here for the Portuguese version.

Tuna and Roasted Hazelnut Coleslaw

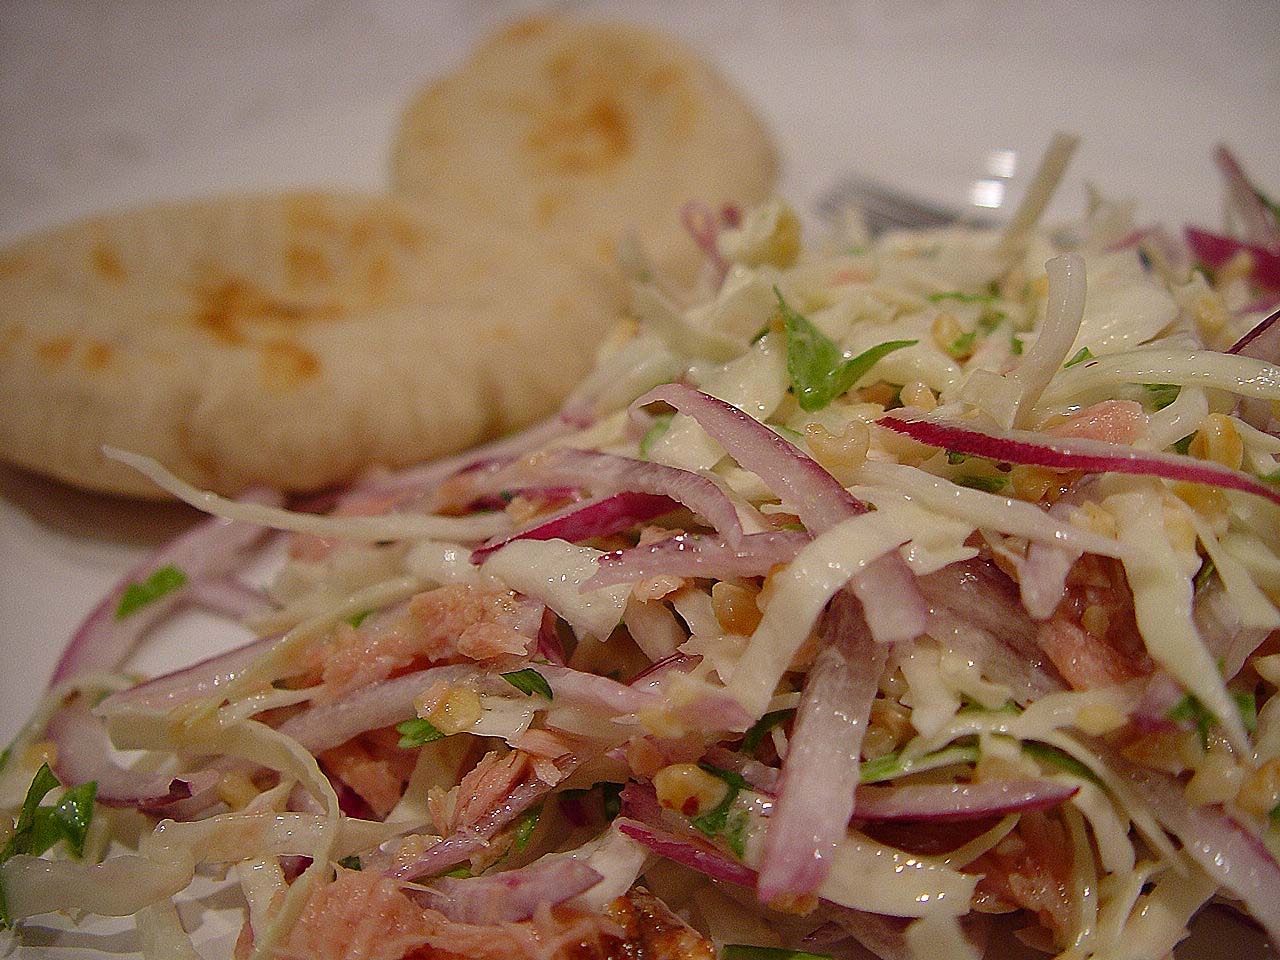
Traditional coleslaw is quite a lovely salad but it can become disgusting if people insist on adding loads of mayo to it. Because of that I very rarely eating the traditional thing unless I prepare it myself. What I really love about it is the crunchiness of the cabbage and the carrot which brings an additional sweetness to it. I do, however, love twists to old ‘favourites’ so this recipe was impossible to resist. Red onions add so much flavour to salads plus a beautiful shade of red/purple as well. I tend to buy good quality tuna for my salads where the tuna used is not fresh, and a brand I particularly like is Ortiz . Their tuna is delicious. I could never go back to the ordinary tuna from the supermarket once I tried this one. The roasted hazelnut add a nice nuttiness to the dish and goes very well indeed with the other ingredients. Toast some pitta bread to have it with.

4 tablespoons of mayonnaise

Juice of ½ lemon

Salt and black pepper

1 white cabbage

1 small red onion

Bunch of fresh flatleaf parsley , chopped

75g chopped roasted hazelnut

400g cans tuna steak in oil

Halve, core and finely shred 1 white cabbage, then put it in a salad bowl. Add 1 small red onion finely sliced the chopped fresh parsley and the chopped roasted hazelnuts. Toss everything. In a smaller bowl mix together the mayo and the lemon juice plus the seasoning. Throw it in the salad bowl and mix all the ingredients well. Drain the tuna steaks and add to the coleslaw, mixing gently. It is ready to be served.

Click here for the Portuguese Version

Monday, June 19, 2006

Stuffed Courgette Rolls


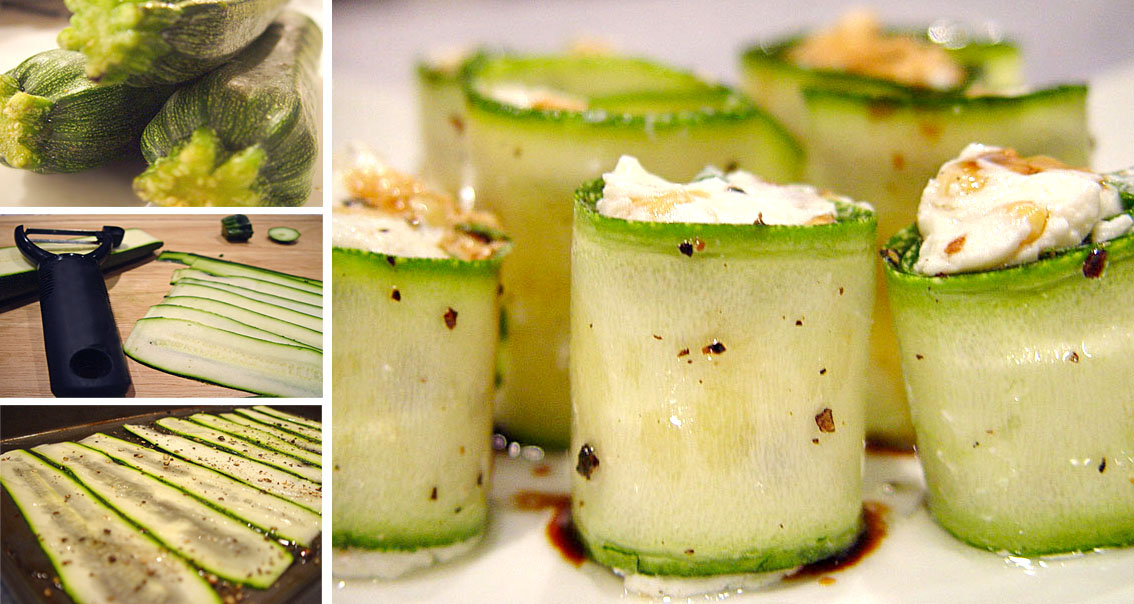
I first saw this recipe being prepared on a DVD that came with one of the magazines I subscribe. It was a teaser to the readers as it contained recipes of the then upcoming Gordon Ramsey’s book Sunday Lunch. He is so full of passion for food and very fresh ingredients that first and foremost I always feel like preparing anything he comes up with. In addition to that I found this recipe to be dead easy, with a lovely base – the courgette, and then the creaminess of the ricotta, the crunchiness of the pine nuts. I played the DVD again for a couple of times and then decided that I had found my dinner dish. This recipe is indeed very simple. As much as I am a big fan of Ramsey I do know my limitations. The balance and freshness of the ingredients is the key to success. You can prepare it as a starter or to nibble whilst drinking a glass of wine with friends. Create an occasion to prepare it if you must. Just don’t miss this opportunity.

I just would like to say that the number of courgettes that you might need will depend on the size of the ones you have. I would even dare suggest that you prepare ¾ first, and then depending on how much filling you have left slice some more. As you prepare these in advance there is no problem if you need to split it into stages.

4 small courgettes, trimmed

Olive oil, to oil and drizzle

250g ricotta

Juice of ½ lemon

Splash of extra virgin olive oil

Sea salt and freshly ground black pepper

Handful of basil leaves, chopped

50g pine nuts, toasted

Balsamic vinegar, to drizzle

Slice the courgettes lengthways, using a swivel vegetable peeler or a mandolin and select about 40 good strips. Place the courgette strips on an oiled tray and brush with olive oil. Season with salt and pepper and chill for 20 minutes.

Mix the ricotta with the lemon juice, extra virgin olive oil and seasoning to taste, then fold in the chopped basil and pine nuts. Place a small teaspoonful of ricotta mixture on one end of the courgette strip and roll up. Repeat to use up all the filling. Arrange the courgette cannelloni on a plate and grind over some black pepper. Drizzle with a little olive oil and balsamic vinegar and serve.

Sunday, June 18, 2006

Confessions in Groups of 5 Meme


Paz of The Cooking Adventures of Chef Paz has put an open invite for this Confessions in Groups of 5 meme. I have decided to join as well.

5 items in the freezer
1. Frozen Peas and spinach
2. Vanilla Ice Cream from Tesco's
3. Frozen Raspberries
4. Chicken breasts
5. Leg of Lamb

5 items in my closet
1. shoes
2. scarves
3. hair dryer
4. jewelery
5. belts

5 items in my (our) car (van)
1.Map of England
2. Brazilian music CDs
3.chewing gum
4.empty shopping bag
5.Halls Extra Strong

5 items in my purse
1. car keys
2. wallet
3. train pass
4. work pass
5. passport

5 Bloggers I tag for this meme
1. Karen
2. Clarice
3. Fran
4. Pille
5. Ana

Thanks, Paz!

Braised Chicken with Apple Sauce and Pitta-style Bread

Both these recipes are from an issue of Gourmet the magazine. For the bread I loved the fact that you could use the grill to get the bread ready. How great is that? The magazine adapted a recipe of a café in Terre Haute, Indiana (I think). The café is called George’s Downtown Café and Diner. The owner of the café, Albert is of Lebanese origin. This bread is great to have with hummus or any other spreads. I had it with some chicken in a caramelized sort of sauce which also had apples in it. It is wonderful to mop up the juices.

Another wonderful think about this bread is that whilst my chicken dish was cooking I got going with my dough. As the chicken got ready I was half way through cooking/grilling/baking my bread (not too sure which one is the right word). It was both wonderfully delicious and extremely satisfying to eat the bread. Strongly recommended.

Better-than-Pitta Grill Bread

2 cups (240 gm) all-purpose flour plus additional for dusting

1 teaspoon sugar

1 teaspoon salt

½ teaspoon fast-acting yeast (such as Fleischmann’s Rapid Rise yeast – I used dried yeast as I couldn’t find the Fleischmann’s one)

¼ (60 ml) cup plus 1 tablespoon warm water (105- 115o~F)

¼ (60 ml) cup canola or vegetable oil

1 tablespoon beaten egg

Lightly oiled ridged grill pan, cast-iron skillet, or griddle

Whisk together flour, sugar, salt and yeast in a bowl until combined. Whisk together water, oil and egg in another bowl until combined well, then stir into flour mixture until a shaggy dough forms. Turn out dough onto a lightly floured surface and knead, working in just enough additional flour to keep dough from sticking – but please avoid that as when mixing dough it is normal that it sticks at first but gets better later. The dough will not be smooth. Form dough into a ball and put in an oiled bowl, turning to coat, then let rest in bowl, uncovered, in a warm draft-free place for 10 minutes.

Cut dough into 10 pieces and form each into a ball. Working with 1 piece at a time, flatten balls, then roll out into thin rounds (very thin) on lightly floured surface with a lightly floured rolling pin.

Preheat grill pan or skillet over moderately high heat just until smoking, then reduce heat to moderate and grill bread rounds, 1 at a time, turning once, until marks appear and bread is cooked through, about 2 minutes. Keep breads warm, wrapped in a cloth napkin.

Braised Chicken with Apples and Sage

8 chicken thighs with skin and bones

1 ¼ teaspoon of salt

½ teaspoon black pepper

1 tablespoon olive oil

1 tablespoon unsalted butter

1 tablespoon packed brown sugar

2 apples (preferably Gala) peeled, cored and cut into ½-inch thick wedges

½ cup chopped shallots

2/3 cup chicken stock

1 teaspoon cider vinegar

½ teaspoon chopped fresh sage

Pat chicken dry and sprinkle all over with salt and pepper. Heat oil in a frying pan over moderately high heat until hot but not smoking, then brown chicken well ( this step is very important), starting with skin sides down and turning over once, 10-12 minutes total. Transfer chicken to a plate and pour off all but 1 tablespoon fat from the pan.

Add butter, brown sugar, apples and shallots to fat in pan and cook over moderate heat, stirring occasionally, until apples are browned, about 5 minutes.

Add stock, vinegar and sage and deglaze the pan by boiling, stirring and scrapping up any brown bits, 1 minute.

Return chicken, skin sides up, to pan along with any juices accumulated on plate. Reduce heat and simmer, loosely covered with foil, until chicken is cooked through and sauce is slightly reduced. It is really important that you have browned chicken very well in the beginning otherwise you will need to let the chicken cook for far too long. The normal cooking time should be around 25 minutes.

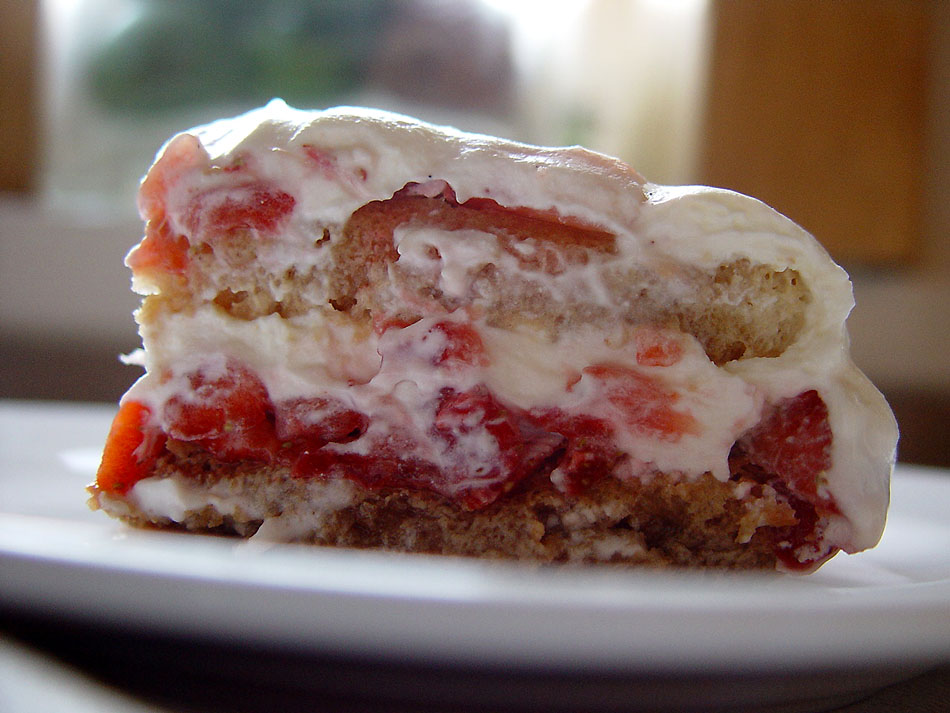
Strawberry Tiramisu

Perhaps the purists will be a bit shocked by the title of this recipe. It is a summery way of presenting tiramisu. I fell for it as I have been avoiding recipes with raw eggs and in a way I could still have some connection with tiramisu but without the eggs.

You could use frozen raspberries but in my book strawberry is just a perfect addition.

It keeps really well as it often lasts for 3 to 4 days in the fridge providing that you cover it with cling film. As a matter of fact the longer it stays in the fridge the more delicious it is as the flavours get more pronounced. If you are having guests for a meal you can prepare it the day before. It doesn’t require much preparation at all. Instead of using Marsala wine any desert wine would be welcome. Once again, if I could just say so, the Marsala is a better combination if using strawberries - in my opinion. The strawberries have to be strained before being added to the dessert otherwise it will be very soggy.

1 ¾ (437 ml) cups single (pouring) cream

500g mascarpone

1 cup (250 ml) Marsala wine

26 sponge finger biscuits

600gm strawberries

Vanilla sugar

Chop the strawberries in small pieces and strain them.

Place the cream in a bowl and whisk until soft peaks form. Fold trough the mascarpone and set aside. Pour the Marsala wine in a in a deep dish and dip the biscuits in the mixture just long enough to dampen them. Layer the base of the dessert dish with half the biscuits. Make a layer of strawberries over the biscuits and then a layer of cream over the strawberries. Repeat all the previous steps, sprinkle with vanilla sugar, cover with cling film and put it in the fridge for at least one hour. The cream will become very firm and make a lovely combination with the soft and moist biscuits plus the sharp strawberries. The longer it stays in the fridge the more delicious it becomes.

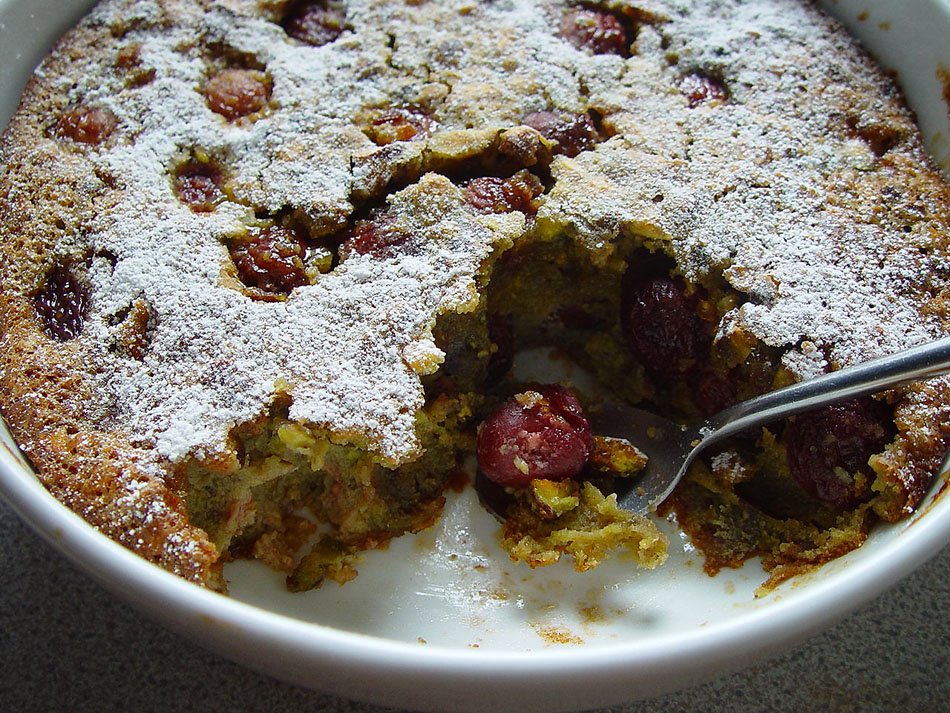
Cherry and Pistachio Clafoutis

The recipe asks for black cherries but I could only find the ordinary cherries. I say ordinary because they are found anywhere when in season. I absolutely love cherries. To the point that I can eat until I have stomach pain. Obviously knowing better I exercise self restrain these days.

I have read so much about clafoutis over the last few weeks – traditional cherry clafoutis, strawberry clafoutis..It was hard not to make some. I have to admit not having had any until today so I do not have anything to compare that with. I can, however, say that the end result is delicious. It is a recipe by a famous Australian desert chef called Philipa Sibley. Her recipes are really lovely and they tend to have a lovely twist. I find that the Australians always bring interesting elements to their recipes and I really love the ones I have already tried.

Even though it is recommended that we eat it as soon as we take it out of the oven – which I did, this morning it tasted just divine. Had it with a cup of coffee and no extra cream. I do not often have such thing for dessert but this morning I could not resist.

With regards to the recipe, as I had no ground pistachio I had to use the food processor to grind the ones I had. I processed it with the sugar as opposed to on its own. This way I made sure that all the lovely oils that are released by the pistachio were all captured by the sugar.

500gm black cherries, pitted

40ml kirsch

Clafoutis batter

1 cup thickened cream

2 eggs

3 eggs yolks

100gm caster sugar

70gm ground pistachio

100gm pistachios, coarsely chopped

1 tbsp plain flour

Pouring cream to serve

Combine the cherries and kirsch and stand for 10 minutes, then scatter over the base of a greased and sugared 6 cup-capacity shallow baking dish.

For the batter, combine thickened cream, eggs and egg yolks in a bowl and whisk until smooth. Combine the sugar, ground pistachios, chopped pistachios and flour in a separate bowl, then add cream mixture, stirring to combine. Pour batter over cherries, and bake at 180C / 160o fan assisted oven, for 20 minutes or until puffed and golden (the centre should still be creamy), and serve immediately with pouring cream passed separately.