Monday, June 19, 2006

Stuffed Courgette Rolls


I first saw this recipe being prepared on a DVD that came with one of the magazines I subscribe. It was a teaser to the readers as it contained recipes of the then upcoming Gordon Ramsey’s book Sunday Lunch. He is so full of passion for food and very fresh ingredients that first and foremost I always feel like preparing anything he comes up with. In addition to that I found this recipe to be dead easy, with a lovely base – the courgette, and then the creaminess of the ricotta, the crunchiness of the pine nuts. I played the DVD again for a couple of times and then decided that I had found my dinner dish. This recipe is indeed very simple. As much as I am a big fan of Ramsey I do know my limitations. The balance and freshness of the ingredients is the key to success. You can prepare it as a starter or to nibble whilst drinking a glass of wine with friends. Create an occasion to prepare it if you must. Just don’t miss this opportunity.

I just would like to say that the number of courgettes that you might need will depend on the size of the ones you have. I would even dare suggest that you prepare ¾ first, and then depending on how much filling you have left slice some more. As you prepare these in advance there is no problem if you need to split it into stages.

4 small courgettes, trimmed

Olive oil, to oil and drizzle

250g ricotta

Juice of ½ lemon

Splash of extra virgin olive oil

Sea salt and freshly ground black pepper

Handful of basil leaves, chopped

50g pine nuts, toasted

Balsamic vinegar, to drizzle

Slice the courgettes lengthways, using a swivel vegetable peeler or a mandolin and select about 40 good strips. Place the courgette strips on an oiled tray and brush with olive oil. Season with salt and pepper and chill for 20 minutes.

Mix the ricotta with the lemon juice, extra virgin olive oil and seasoning to taste, then fold in the chopped basil and pine nuts. Place a small teaspoonful of ricotta mixture on one end of the courgette strip and roll up. Repeat to use up all the filling. Arrange the courgette cannelloni on a plate and grind over some black pepper. Drizzle with a little olive oil and balsamic vinegar and serve.

Sunday, June 18, 2006

Confessions in Groups of 5 Meme


Paz of The Cooking Adventures of Chef Paz has put an open invite for this Confessions in Groups of 5 meme. I have decided to join as well.

5 items in the freezer
1. Frozen Peas and spinach
2. Vanilla Ice Cream from Tesco's
3. Frozen Raspberries
4. Chicken breasts
5. Leg of Lamb

5 items in my closet
1. shoes
2. scarves
3. hair dryer
4. jewelery
5. belts

5 items in my (our) car (van)
1.Map of England
2. Brazilian music CDs
3.chewing gum
4.empty shopping bag
5.Halls Extra Strong

5 items in my purse
1. car keys
2. wallet
3. train pass
4. work pass
5. passport

5 Bloggers I tag for this meme
1. Karen
2. Clarice
3. Fran
4. Pille
5. Ana

Thanks, Paz!

Braised Chicken with Apple Sauce and Pitta-style Bread

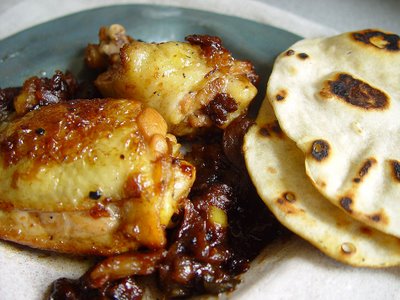
Both these recipes are from an issue of Gourmet the magazine. For the bread I loved the fact that you could use the grill to get the bread ready. How great is that? The magazine adapted a recipe of a café in Terre Haute, Indiana (I think). The café is called George’s Downtown Café and Diner. The owner of the café, Albert is of Lebanese origin. This bread is great to have with hummus or any other spreads. I had it with some chicken in a caramelized sort of sauce which also had apples in it. It is wonderful to mop up the juices.

Another wonderful think about this bread is that whilst my chicken dish was cooking I got going with my dough. As the chicken got ready I was half way through cooking/grilling/baking my bread (not too sure which one is the right word). It was both wonderfully delicious and extremely satisfying to eat the bread. Strongly recommended.

Better-than-Pitta Grill Bread

2 cups (240 gm) all-purpose flour plus additional for dusting

1 teaspoon sugar

1 teaspoon salt

½ teaspoon fast-acting yeast (such as Fleischmann’s Rapid Rise yeast – I used dried yeast as I couldn’t find the Fleischmann’s one)

¼ (60 ml) cup plus 1 tablespoon warm water (105- 115o~F)

¼ (60 ml) cup canola or vegetable oil

1 tablespoon beaten egg

Lightly oiled ridged grill pan, cast-iron skillet, or griddle

Whisk together flour, sugar, salt and yeast in a bowl until combined. Whisk together water, oil and egg in another bowl until combined well, then stir into flour mixture until a shaggy dough forms. Turn out dough onto a lightly floured surface and knead, working in just enough additional flour to keep dough from sticking – but please avoid that as when mixing dough it is normal that it sticks at first but gets better later. The dough will not be smooth. Form dough into a ball and put in an oiled bowl, turning to coat, then let rest in bowl, uncovered, in a warm draft-free place for 10 minutes.

Cut dough into 10 pieces and form each into a ball. Working with 1 piece at a time, flatten balls, then roll out into thin rounds (very thin) on lightly floured surface with a lightly floured rolling pin.

Preheat grill pan or skillet over moderately high heat just until smoking, then reduce heat to moderate and grill bread rounds, 1 at a time, turning once, until marks appear and bread is cooked through, about 2 minutes. Keep breads warm, wrapped in a cloth napkin.

Braised Chicken with Apples and Sage

8 chicken thighs with skin and bones

1 ¼ teaspoon of salt

½ teaspoon black pepper

1 tablespoon olive oil

1 tablespoon unsalted butter

1 tablespoon packed brown sugar

2 apples (preferably Gala) peeled, cored and cut into ½-inch thick wedges

½ cup chopped shallots

2/3 cup chicken stock

1 teaspoon cider vinegar

½ teaspoon chopped fresh sage

Pat chicken dry and sprinkle all over with salt and pepper. Heat oil in a frying pan over moderately high heat until hot but not smoking, then brown chicken well ( this step is very important), starting with skin sides down and turning over once, 10-12 minutes total. Transfer chicken to a plate and pour off all but 1 tablespoon fat from the pan.

Add butter, brown sugar, apples and shallots to fat in pan and cook over moderate heat, stirring occasionally, until apples are browned, about 5 minutes.

Add stock, vinegar and sage and deglaze the pan by boiling, stirring and scrapping up any brown bits, 1 minute.

Return chicken, skin sides up, to pan along with any juices accumulated on plate. Reduce heat and simmer, loosely covered with foil, until chicken is cooked through and sauce is slightly reduced. It is really important that you have browned chicken very well in the beginning otherwise you will need to let the chicken cook for far too long. The normal cooking time should be around 25 minutes.

Strawberry Tiramisu

Perhaps the purists will be a bit shocked by the title of this recipe. It is a summery way of presenting tiramisu. I fell for it as I have been avoiding recipes with raw eggs and in a way I could still have some connection with tiramisu but without the eggs.

You could use frozen raspberries but in my book strawberry is just a perfect addition.

It keeps really well as it often lasts for 3 to 4 days in the fridge providing that you cover it with cling film. As a matter of fact the longer it stays in the fridge the more delicious it is as the flavours get more pronounced. If you are having guests for a meal you can prepare it the day before. It doesn’t require much preparation at all. Instead of using Marsala wine any desert wine would be welcome. Once again, if I could just say so, the Marsala is a better combination if using strawberries - in my opinion. The strawberries have to be strained before being added to the dessert otherwise it will be very soggy.

1 ¾ (437 ml) cups single (pouring) cream

500g mascarpone

1 cup (250 ml) Marsala wine

26 sponge finger biscuits

600gm strawberries

Vanilla sugar

Chop the strawberries in small pieces and strain them.

Place the cream in a bowl and whisk until soft peaks form. Fold trough the mascarpone and set aside. Pour the Marsala wine in a in a deep dish and dip the biscuits in the mixture just long enough to dampen them. Layer the base of the dessert dish with half the biscuits. Make a layer of strawberries over the biscuits and then a layer of cream over the strawberries. Repeat all the previous steps, sprinkle with vanilla sugar, cover with cling film and put it in the fridge for at least one hour. The cream will become very firm and make a lovely combination with the soft and moist biscuits plus the sharp strawberries. The longer it stays in the fridge the more delicious it becomes.

Cherry and Pistachio Clafoutis

The recipe asks for black cherries but I could only find the ordinary cherries. I say ordinary because they are found anywhere when in season. I absolutely love cherries. To the point that I can eat until I have stomach pain. Obviously knowing better I exercise self restrain these days.

I have read so much about clafoutis over the last few weeks – traditional cherry clafoutis, strawberry clafoutis..It was hard not to make some. I have to admit not having had any until today so I do not have anything to compare that with. I can, however, say that the end result is delicious. It is a recipe by a famous Australian desert chef called Philipa Sibley. Her recipes are really lovely and they tend to have a lovely twist. I find that the Australians always bring interesting elements to their recipes and I really love the ones I have already tried.

Even though it is recommended that we eat it as soon as we take it out of the oven – which I did, this morning it tasted just divine. Had it with a cup of coffee and no extra cream. I do not often have such thing for dessert but this morning I could not resist.

With regards to the recipe, as I had no ground pistachio I had to use the food processor to grind the ones I had. I processed it with the sugar as opposed to on its own. This way I made sure that all the lovely oils that are released by the pistachio were all captured by the sugar.

500gm black cherries, pitted

40ml kirsch

Clafoutis batter

1 cup thickened cream

2 eggs

3 eggs yolks

100gm caster sugar

70gm ground pistachio

100gm pistachios, coarsely chopped

1 tbsp plain flour

Pouring cream to serve

Combine the cherries and kirsch and stand for 10 minutes, then scatter over the base of a greased and sugared 6 cup-capacity shallow baking dish.

For the batter, combine thickened cream, eggs and egg yolks in a bowl and whisk until smooth. Combine the sugar, ground pistachios, chopped pistachios and flour in a separate bowl, then add cream mixture, stirring to combine. Pour batter over cherries, and bake at 180C / 160o fan assisted oven, for 20 minutes or until puffed and golden (the centre should still be creamy), and serve immediately with pouring cream passed separately.

Sunday, June 04, 2006

Suzy's Cake - Pierre Hermé

After reading so much about Pierre Hermé in different blogs I ordered his Chocolate Desserts book from Amazon. When the book arrived I thought that perhaps I had been a bit premature since it all looked so grand. However, I was wrong; the book is not only beautifully photographed but also has wonderful recipes, nicely explained. I strongly recommend it. Yesterday I decided to make use of it by preparing a recipe for my dinner party to two very dear friends. I ended up choosing this beautiful chocolate cake entitled Suzy’s cake. Suzy is a good friend of Pierre and Frédérick. The cake is a wonderfully moist and terribly delicious chocolate cake. Very easy to prepare - its secret likes in the quality of the chocolate. I laid a very fine layer of batter, and then put fresh raspberries over it before putting the rest of the batter over it. We were unanimous in electing it one of the most wonderful non fussy chocolate cakes we have eaten. We had some vanilla ice cream on the side but I am still to have it with ginger icre cream as Hermé says that it makes a very nice match.

Sharing it with you:

250g bittersweet chocolate, preferably Valrhona Guanaja

250g unsalted butter, at room temperature

200g sugar

4 large eggs at room temperature

70g all-purpose flour

Center a rack in the oven and preheat the oven to 180oC (350oC). Butter a 24-cm (9-inch) round cake pan that is at least 5 cm (2 inches) high, line the bottom with parchment paper, butter the paper, and dust the inside of the pan with flour; tap out the excess and set the pan aside.

Place the chocolate in a heatproof bowl over – not touching – simmering water and heat until the chocolate is melted; or melt the chocolate in a microwave oven. Set the chocolate aside to cool; it should feel only just warm to the touch when you mix it with the rest of the ingredients.

Put the butter and sugar in the bowl of a mixer and beat on medium speed for about 4 minutes, scraping down the sides of the bowl frequently, until the butter is creamy and the sugar well blended into it. Add the eggs one at a time, beating for about 1 minute after each addition. Reduce the mixer speed to low, pour in the cooled chocolate, and mix only until it disappears into the batter. Alternatively, you can fold in the last of the flour with a rubber spatula. You’ll have a thick, smooth, satiny batter that looks like old-fashioned chocolate frosting.

Scrape the batter into the pan, smooth the top, and slide the pan into the oven. Bake for 26 to 29 minutes or until the cake rises slightly and the top has lost its sheen. The top may crack a bit and the cake may not look entirely set in the center; when you test the cake by inserting a slender knife into the center, the knife will come out lightly streaked with batter, which is what you want. Transfer the cake to a rack to cool.

When the cake has cooled, chill it in the refrigerator for an hour or two to make it easy to unmould. Turn the cake out, remove the parchment, and invert the cake onto a serving platter so that it is right side up. Allow the cake to come to room temperature before slicing and serving.